AI Assistants
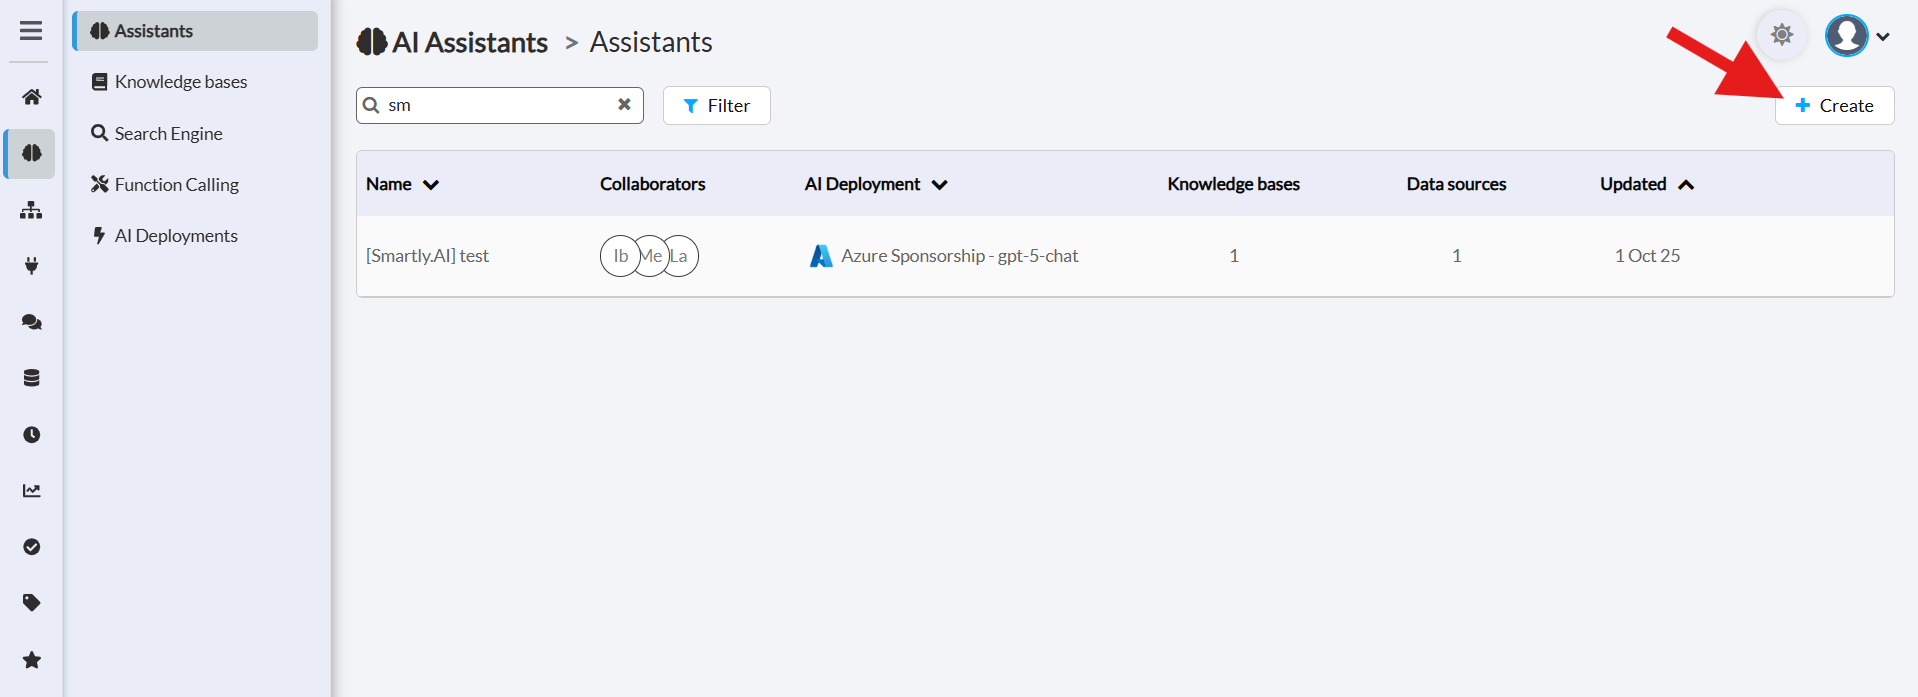
When you arrive in this section, you will see a list of all your assistants. This interface gives you a quick overview of key information and allows you to manage your assistants efficiently.

Available Information
The main list contains the following columns:
- Name: The name of your assistant.
- Collaborators: The users who have access to this assistant.
- AI Deployment: The AI model (e.g., GPT-4, Gemini) that the assistant uses to generate its responses.
- Knowledge Bases: The number of knowledge bases connected to this assistant.
- Data Sources: The total number of data sources (files, URLs) within the connected knowledge bases.
- Updated: The date of the assistant’s last modification.
Filters
To quickly find an assistant, you can use the Filter button.
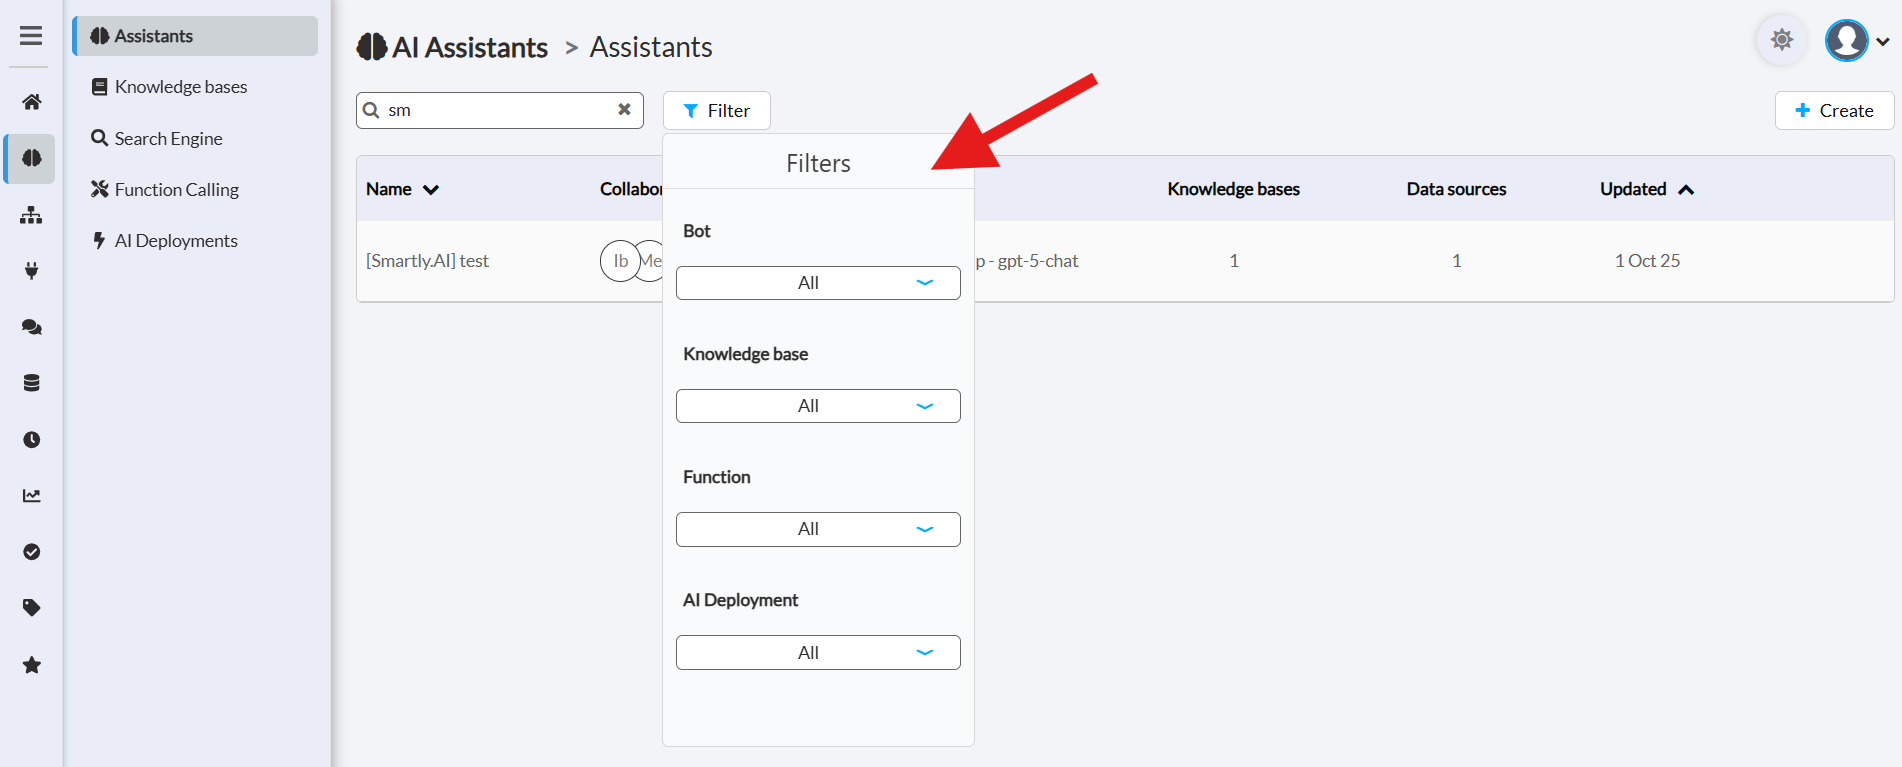
The available filtering options are:
Bot: Filter by the bot the assistant is associated with.
Knowledge Base: Find assistants that use a specific knowledge base.
Function: Filter by assistants that use a particular function (Function Calling).
AI Deployment: Show assistants that use a specific AI model.
Create and Configure an Assistant
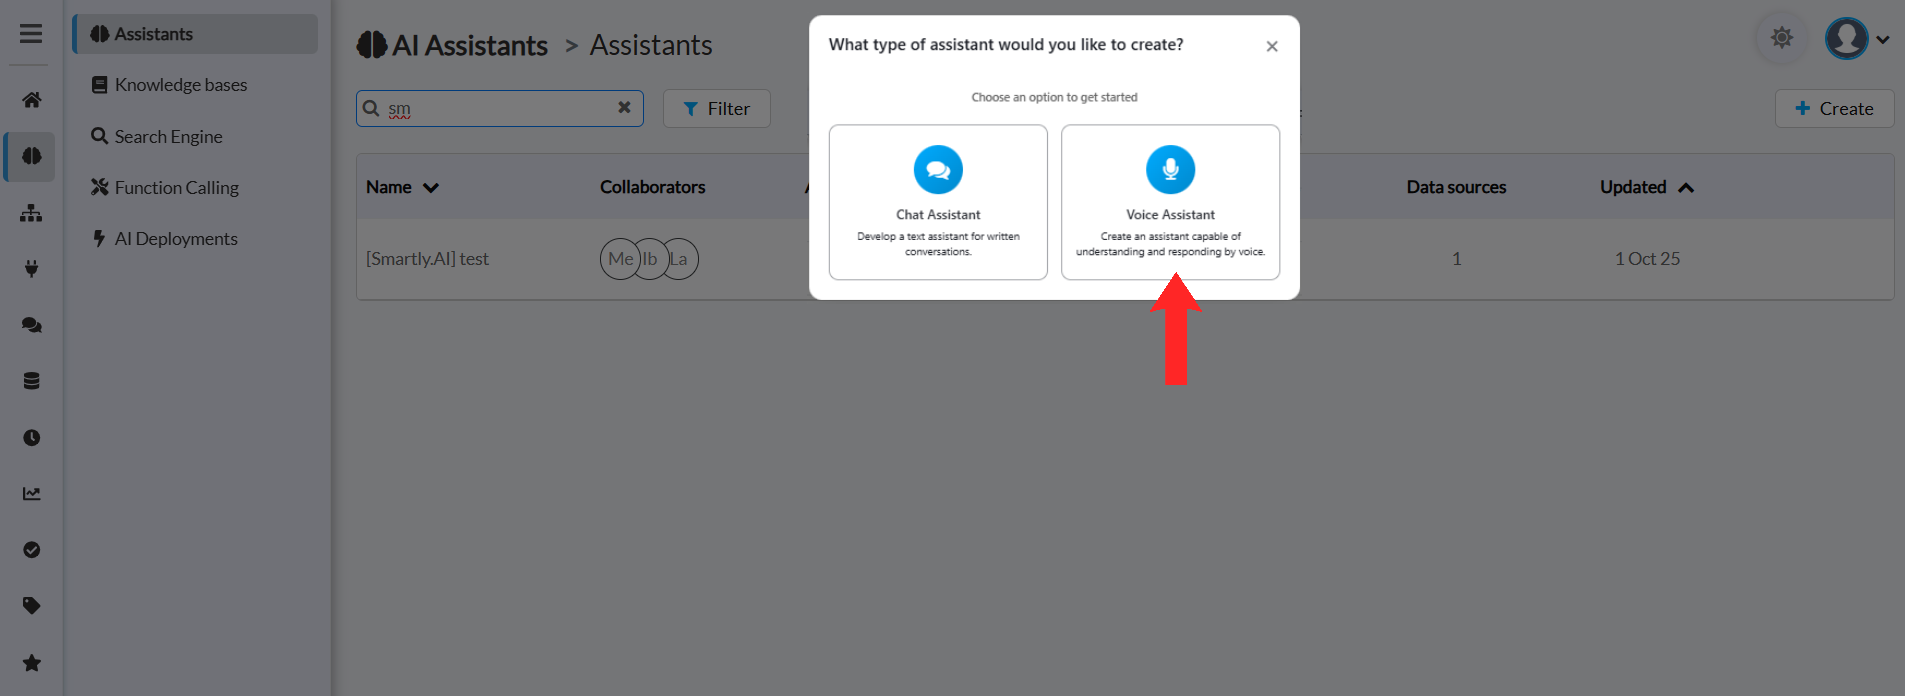
To create a new assistant, click the "+ Create" button. A configuration window will appear, guiding you through the different options.
This will open a modal asking you what type of assistant you would like to create.
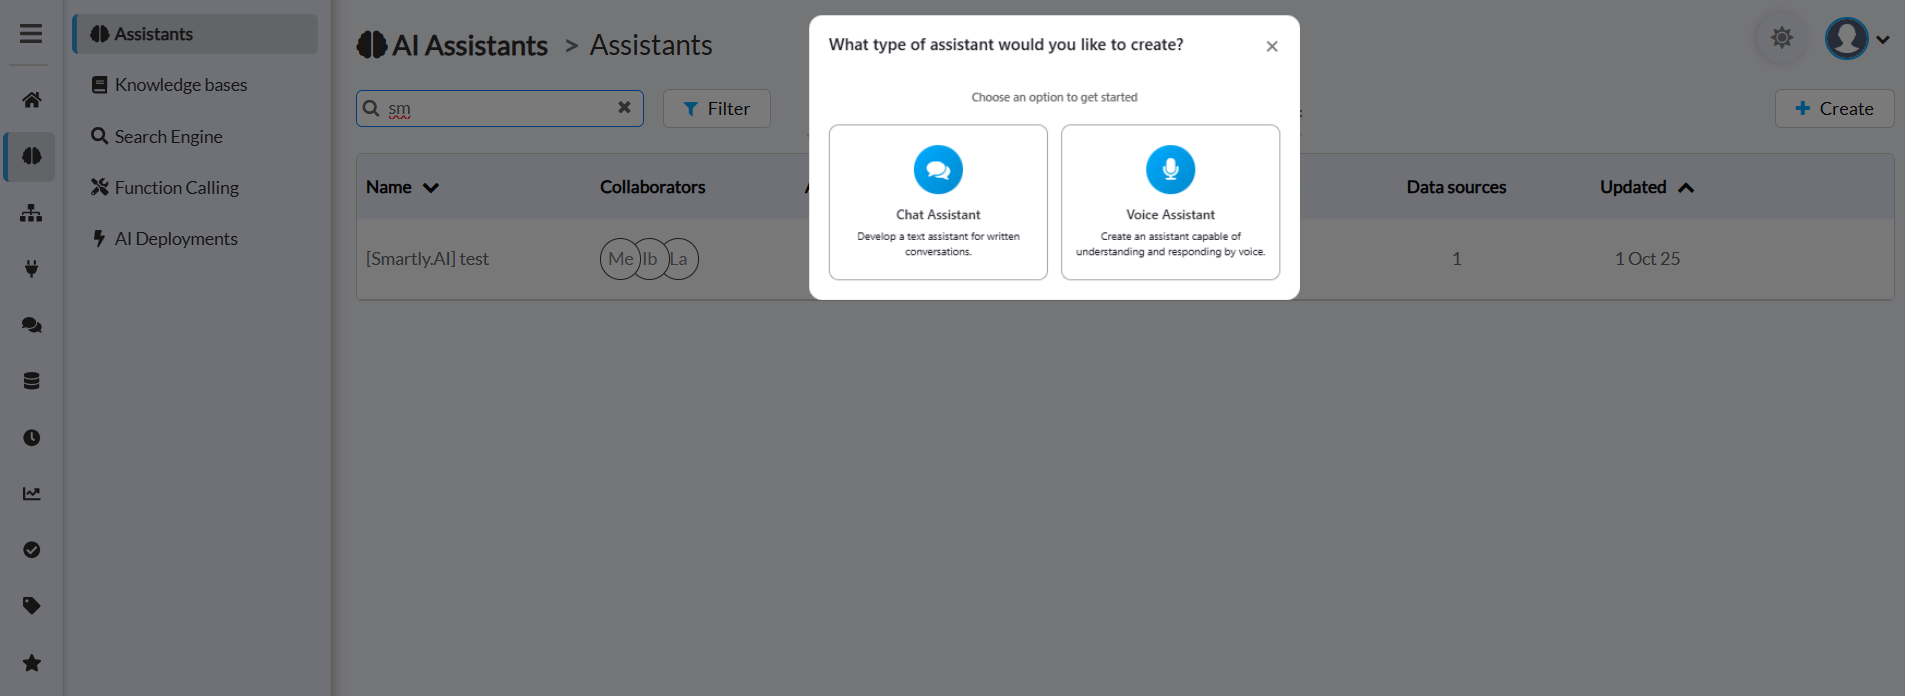
Choose between:
- Text Assistant — A traditional chat-based assistant for text interactions
- Voice Assistant — An assistant capable of understanding and responding by voice
Text Assistant
Select "Text Assistant" to create a traditional chat-based assistant. A configuration window will appear, guiding you through the different options.
Main Settings
These options are the most important for defining the basic behavior of your assistant.
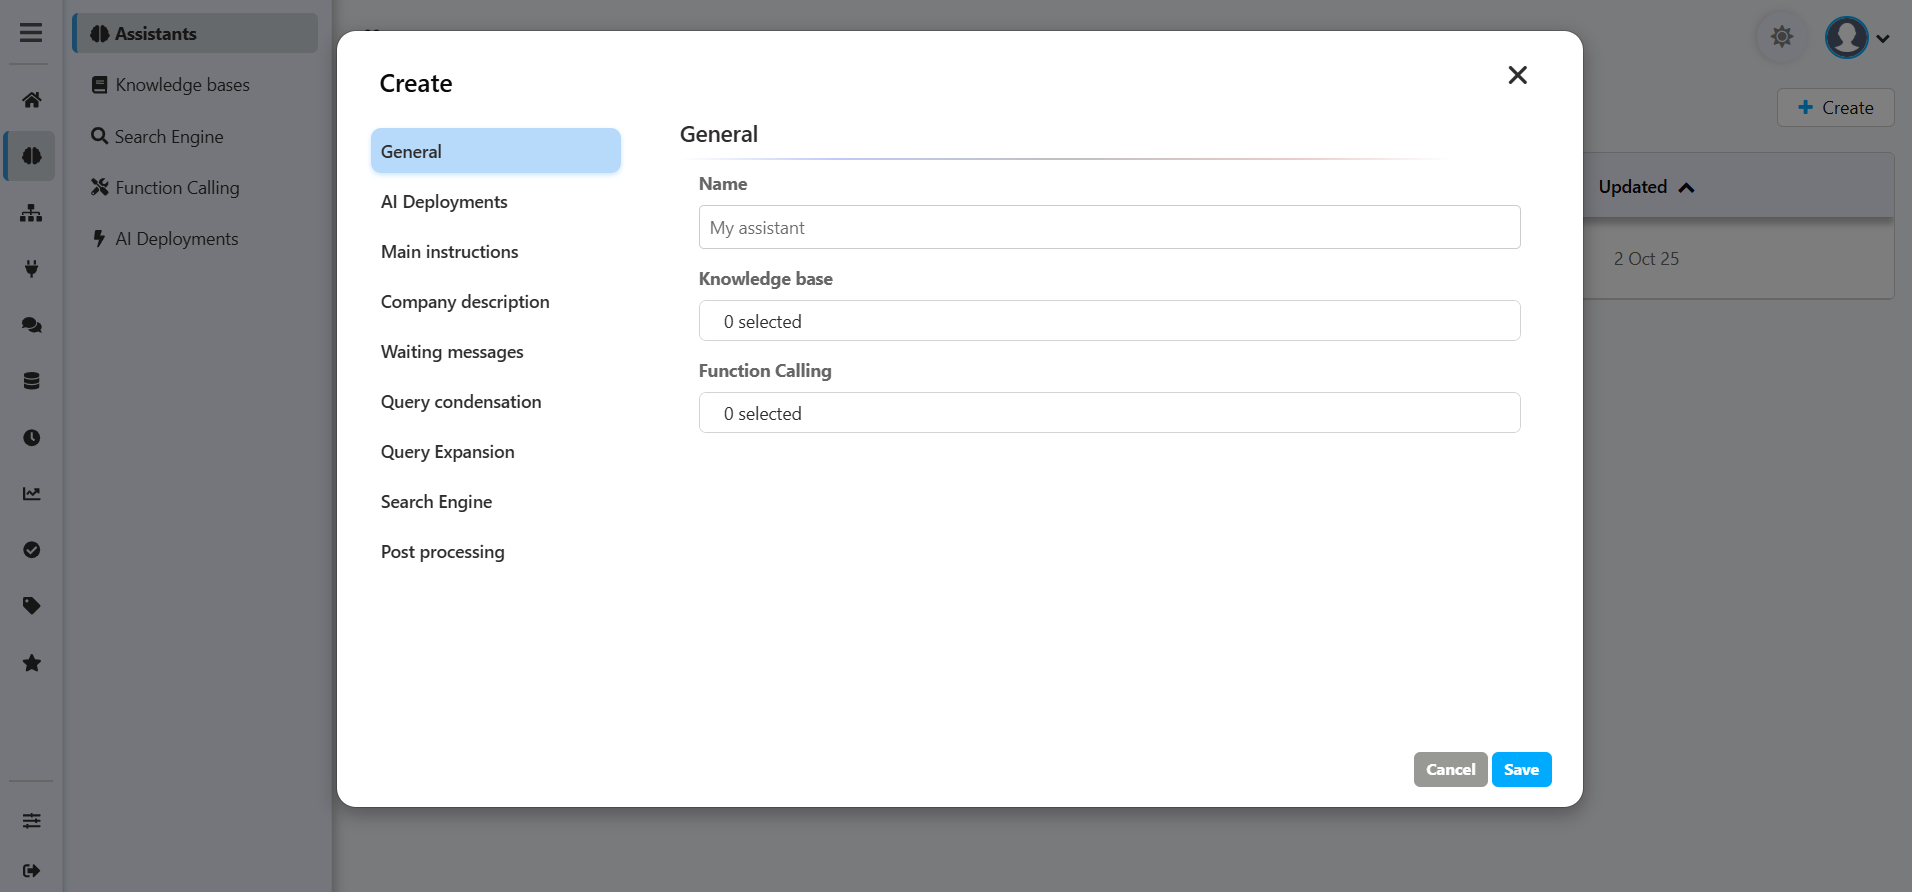
- Name: Give your assistant a clear name.
- Knowledge Base: Connect one or more knowledge bases. This is the main source of information your AI will use to provide accurate answers. For a complete guide, please refer to the Knowledge Base section.
- Function Calling: Allow your assistant to interact with external tools or APIs to perform actions (e.g., search for a product, create a ticket). To learn how to set this up, see the Function Calling section.
- AI Deployments: Select the AI model ("brain") your assistant will use. For a detailed list of models and their configurations, see the AI Deployments section.
- Main Instructions: This is where you define your assistant’s personality and rules. Assign its role, tone, and clear guidelines on what it should or should not do. Explore all the possibilities in the Main Instructions section.
Advanced Settings
Company Description :
The Company Description is an essential part of tailoring your bot's responses and behavior. This information is utilized in the bot's instructions, helping it become more aware of the company it represents, its services, and how users can get in touch.
Here are the available fields for describing your company:

- Name: The official name of your company. Helps the bot refer to the company accurately.
- Description: A succinct overview of your company’s focus or services. This enables the bot to provide context-appropriate responses.
- Website: Your official website. Note: this is used only for reference to help the bot understand its digital context; no data will be pulled from it.
- Location: The geographical location of your company. Useful for location-specific queries.
- Phone Number: A contact phone number for your company. This can be offered to users seeking to contact you.
- Contact Page: The URL of the contact page on your website. Ideal for directing users who have detailed queries or require human assistance.
- Contact Email: The email address where users can send inquiries. Provides an alternative contact method.
Waiting messages
Customize the messages that users see while the AI is working. This enhances the user experience by showing that the bot is active. You can set messages for each step of the process: analysis, search, and response generation.
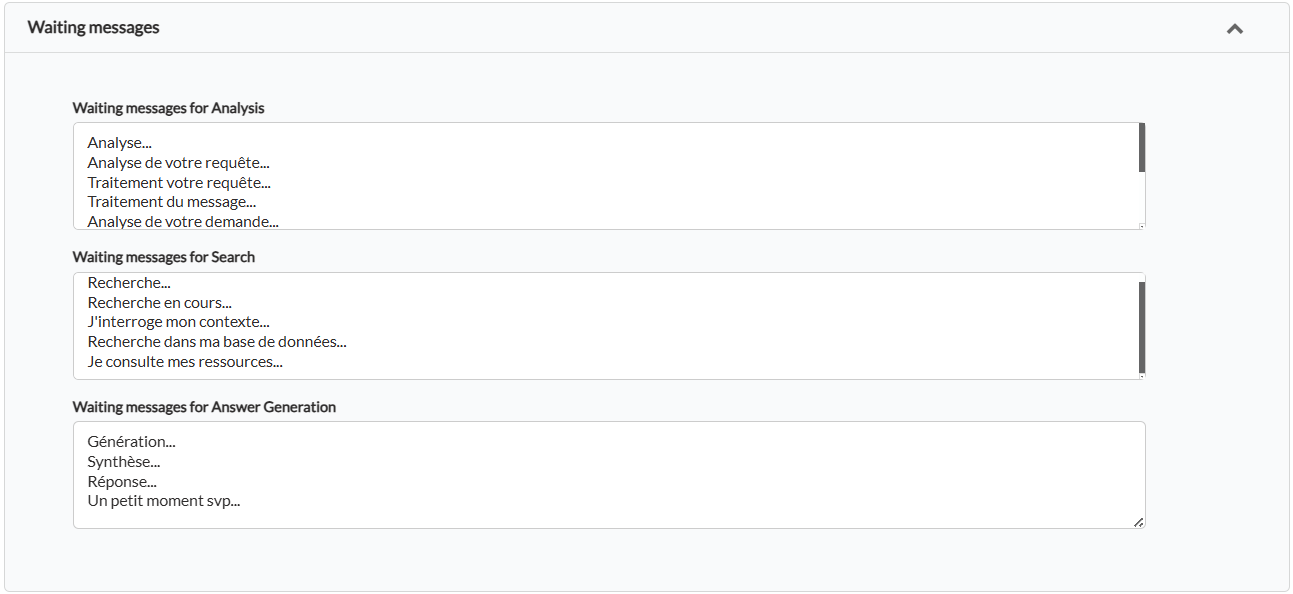
For each step, you can list multiple messages (one per line). The system will randomly select one each time, making the interaction more dynamic.
Query condensation
User questions can be long or span multiple messages. Condensation simplifies these inputs into a single clear question while retaining the conversation context.
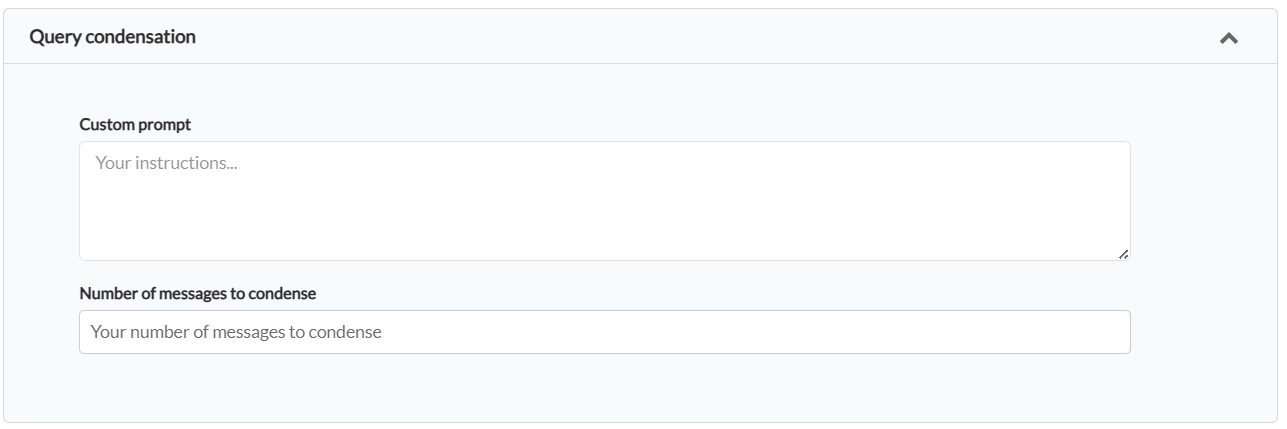
Custom Prompt: Allows you to give specific instructions to the AI on how to condense the question.
Number of Messages to Condense: Sets the number of previous messages in the conversation to consider when creating the condensed query.
Query Expansion
This step takes the condensed query and expands it into multiple variations. It uses synonyms and alternative phrasings to ensure that all relevant information in the knowledge base can be found, even if the exact terms are not used.
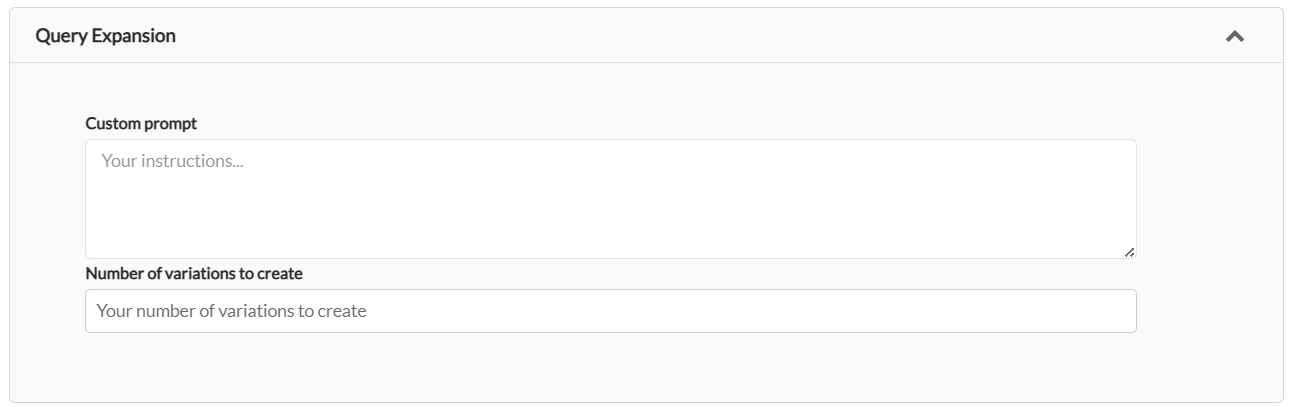
Custom Prompt: Allows you to guide the AI on how to create variations of the question.
Number of Variations to Create: The number of alternative questions to generate for the search.
Search Engine
The knowledge base is transformed into an index that functions as a search engine. This engine typically employs cosine similarity to retrieve relevant information. In our Generative AI system based on Retrieval Augmented Generation (RAG), we continually search for text chunks within the knowledge base that could assist in generating answers. The most relevant chunks are then added to the context provided to the Large Language Model (LLM).

Number of Best Results: Sets the maximum number of relevant "chunks" of information to keep and send to the LLM for generating its response.
Similarity Threshold: This is the minimum similarity score (usually between 70% and 80%) that a chunk must have with the user’s question to be considered relevant. It helps filter out off-topic information.
Post processing
This final step applies actions to the response once it has been generated by the AI, but just before it is sent to the user.
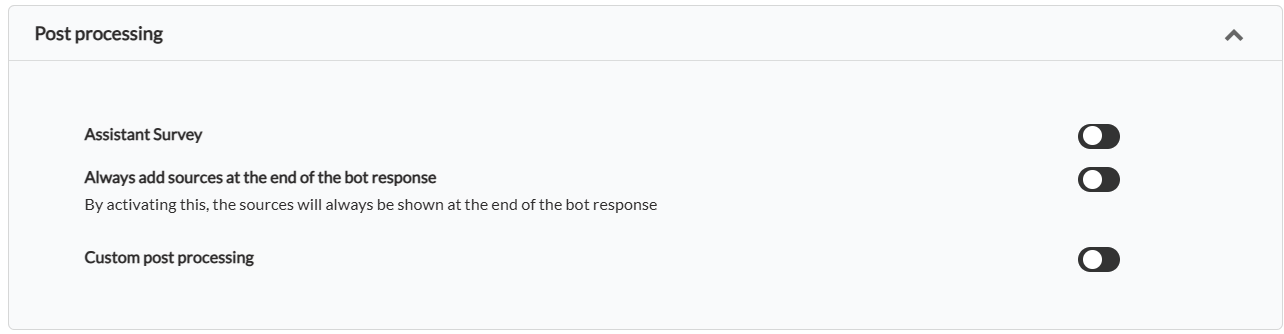
Assistant Survey: Activates a survey (e.g., "thumbs up / thumbs down") after the response to collect user feedback.
Always Add Sources at the End of the Bot Response: If enabled, the assistant will always cite the knowledge base sources it used to formulate its response.
Custom Post Processing: Allows you to apply custom rules or transformations to the final response text (e.g., censor certain words or format specific elements).
Voice Assistant
Select "Voice Assistant" to create an assistant capable of understanding and responding by voice. This will open the configuration window where you can set up your vocal assistant.
Main Settings
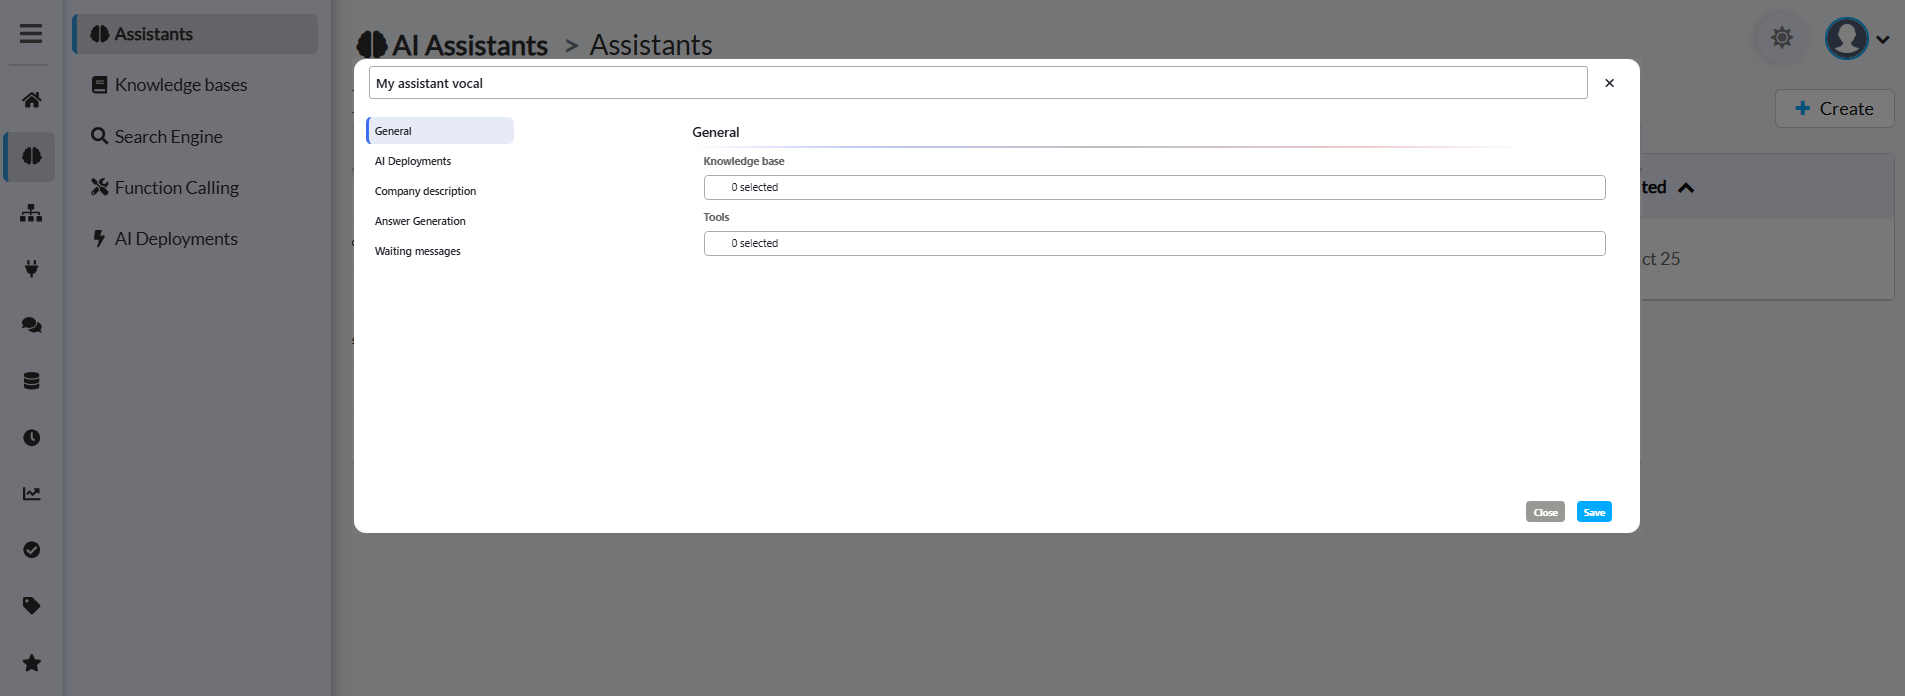
Configure the essential settings for your voice assistant:
- Name: Give your assistant a clear name.
- Knowledge Base: Connect one or more knowledge bases. This is the main source of information your AI will use to provide accurate answers. For a complete guide, please refer to the Knowledge Base section.
- Function Calling: Allow your assistant to interact with external tools or APIs to perform actions (e.g., search for a product, create a ticket). To learn how to set this up, see the Function Calling section.
- AI Deployments: Select the AI model ("brain") your assistant will use. For a detailed list of models and their configurations, see the AI Deployments section.
- Answer Generation: This is where you define your assistant's personality and rules. Assign its role, tone, and clear guidelines on what it should or should not do. Explore all the possibilities in the Main Instructions section.
- AI Deployments: Select the AI model ("brain") your assistant will use. For a detailed list of models and their configurations, see the AI Deployments section.
- Function Calling: Allow your assistant to interact with external tools or APIs to perform actions (e.g., search for a product, create a ticket). To learn how to set this up, see the Function Calling section.
- Knowledge Base: Connect one or more knowledge bases. This is the main source of information your AI will use to provide accurate answers. For a complete guide, please refer to the Knowledge Base section.
Advanced Settings
AI Deployments
Select the AI model that will power your voice assistant. The deployment determines how your assistant processes and generates responses.
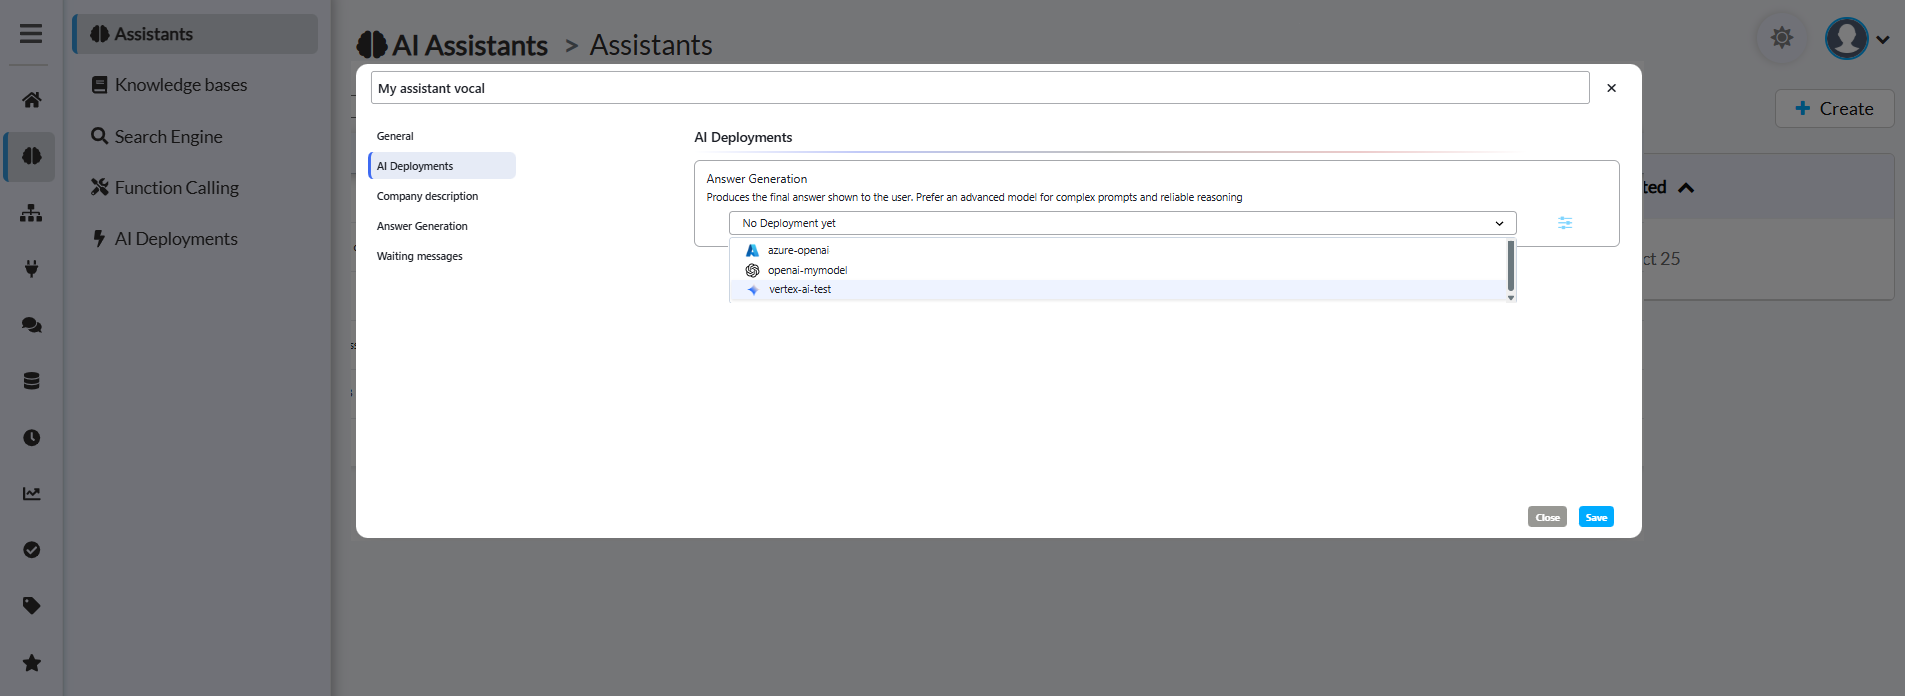
Answer Generation:
This deployment produces the final answer to the user. You should prefer an advanced model for complex prompts and reliable reasoning.
⚠️ Important:
For voice assistants, you must create and select a voice model deployment. Voice models are optimized for low-latency voice interactions and streaming responses.
To learn how to create a voice model deployment, see the Voice Model Deployment section.
Company Description
This information is utilized in the bot's instructions, helping it become more aware of the company it represents. Providing detailed company information allows the assistant to give more contextual and relevant responses.
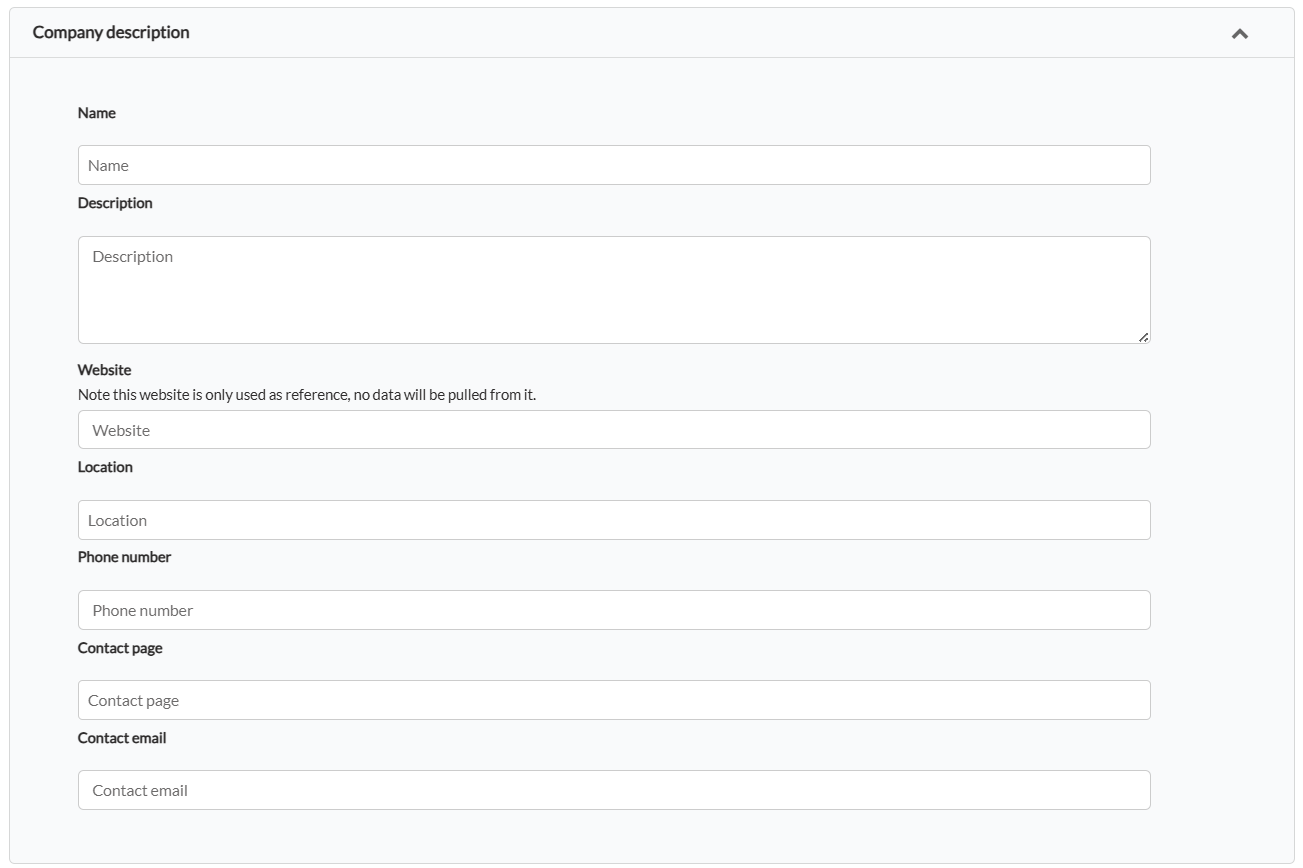
Fields:
- Name: Your company name
- Description: A brief description of what your company does
- Website: Company website URL
- Location: Physical location or headquarters
- Phone Number: Main contact phone number
- Contact Page: URL to your contact page
- Contact Email: Main support or contact email
- Contact Page: URL to your contact page
- Phone Number: Main contact phone number
- Location: Physical location or headquarters
- Website: Company website URL
- Description: A brief description of what your company does
Example:
Name: TechCorp Solutions
Description: We provide cutting-edge software solutions for enterprise
clients, specializing in cloud infrastructure and AI integration.
Website: https://techcorp.example.com
Location: San Francisco, CA, USA
Phone Number: +1 (555) 123-4567
Contact Page: https://techcorp.example.com/contact
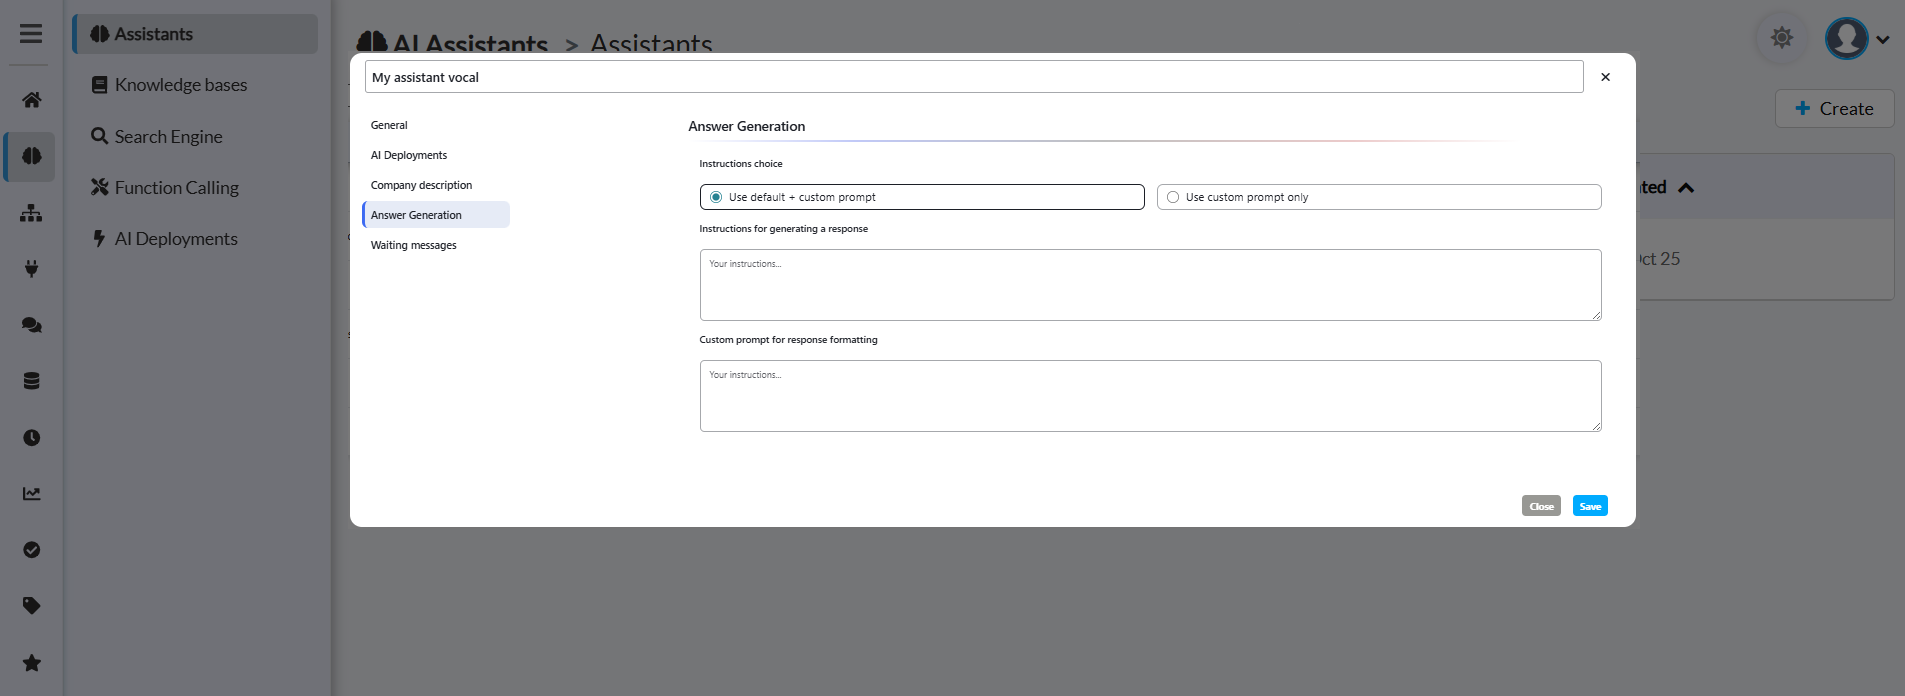
Contact Email: [email protected]Answer Generation
Define how your vocal assistant generates and delivers responses:

Instructions Choice:
- Use default + custom prompt: Combines system defaults with your custom instructions
- Use custom prompt only: Uses only your custom instructions
Instructions for generating a response:
- Define how your assistant should generate answers
- Set the tone, style, and approach for responses
Custom prompt for response formatting:
- Specify how responses should be structured and formatted
- Control the presentation and organization of answers
Waiting Messages
Configure messages that play while the assistant is processing different types of tasks. These messages keep users informed and engaged during processing time.
For each step, you can list multiple messages (one per line). The system will randomly select one each time, making the interaction more dynamic.
Saving Your Voice Assistant
Once you've configured all the settings, click the Save button located at the bottom right of the modal to create your voice assistant.
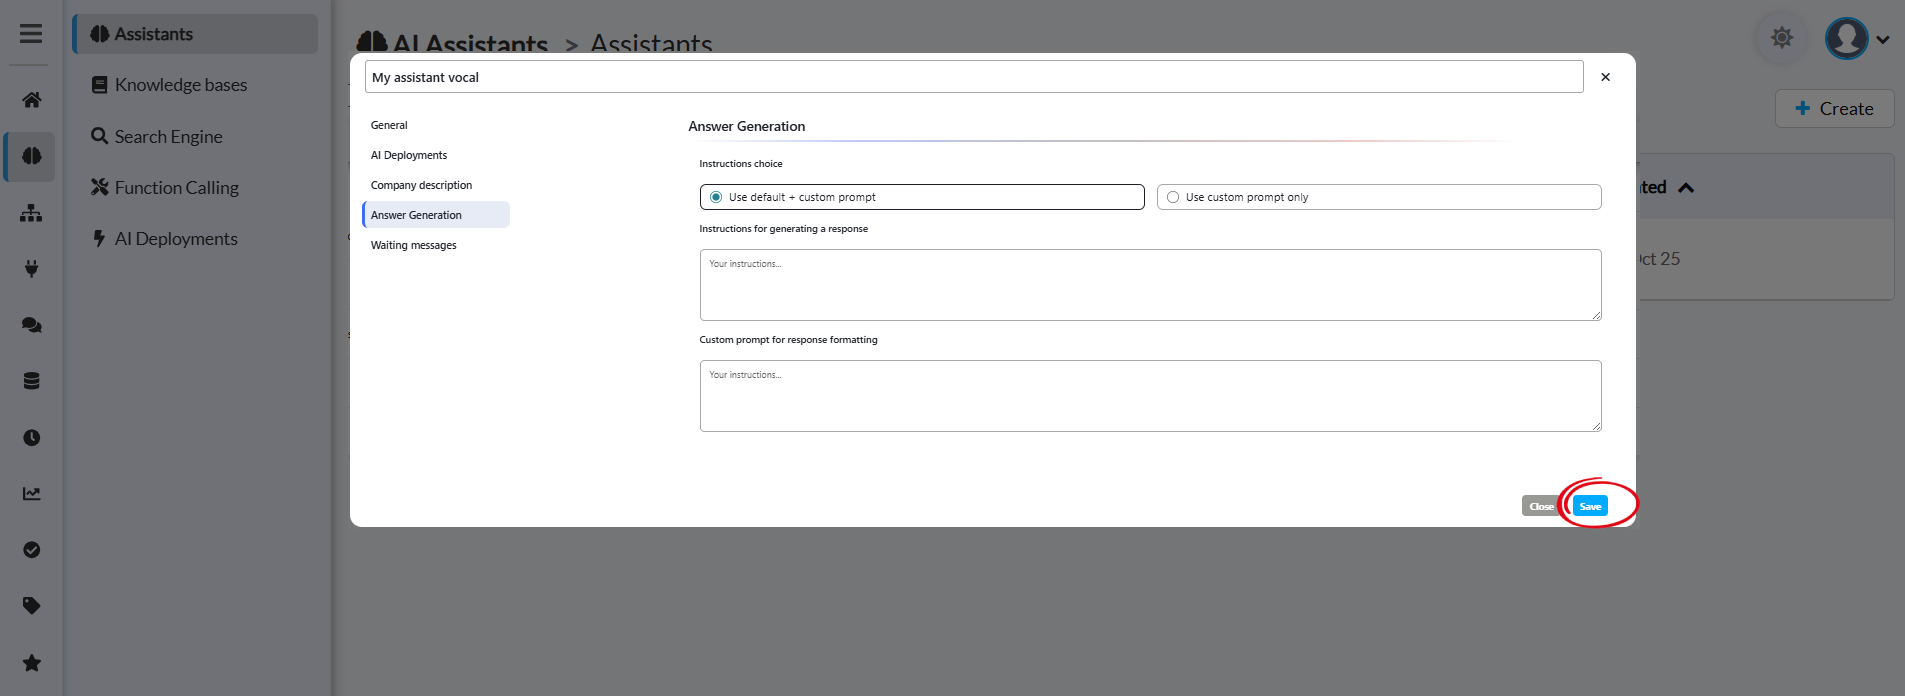
Your voice assistant is now ready to use!
Deploy Your Gen AI
Available Channels
Gen AI is compatible with all channels supported by Smartly.AI, offering you a range of avenues for user interaction.
Connecting your bot to Gen AI
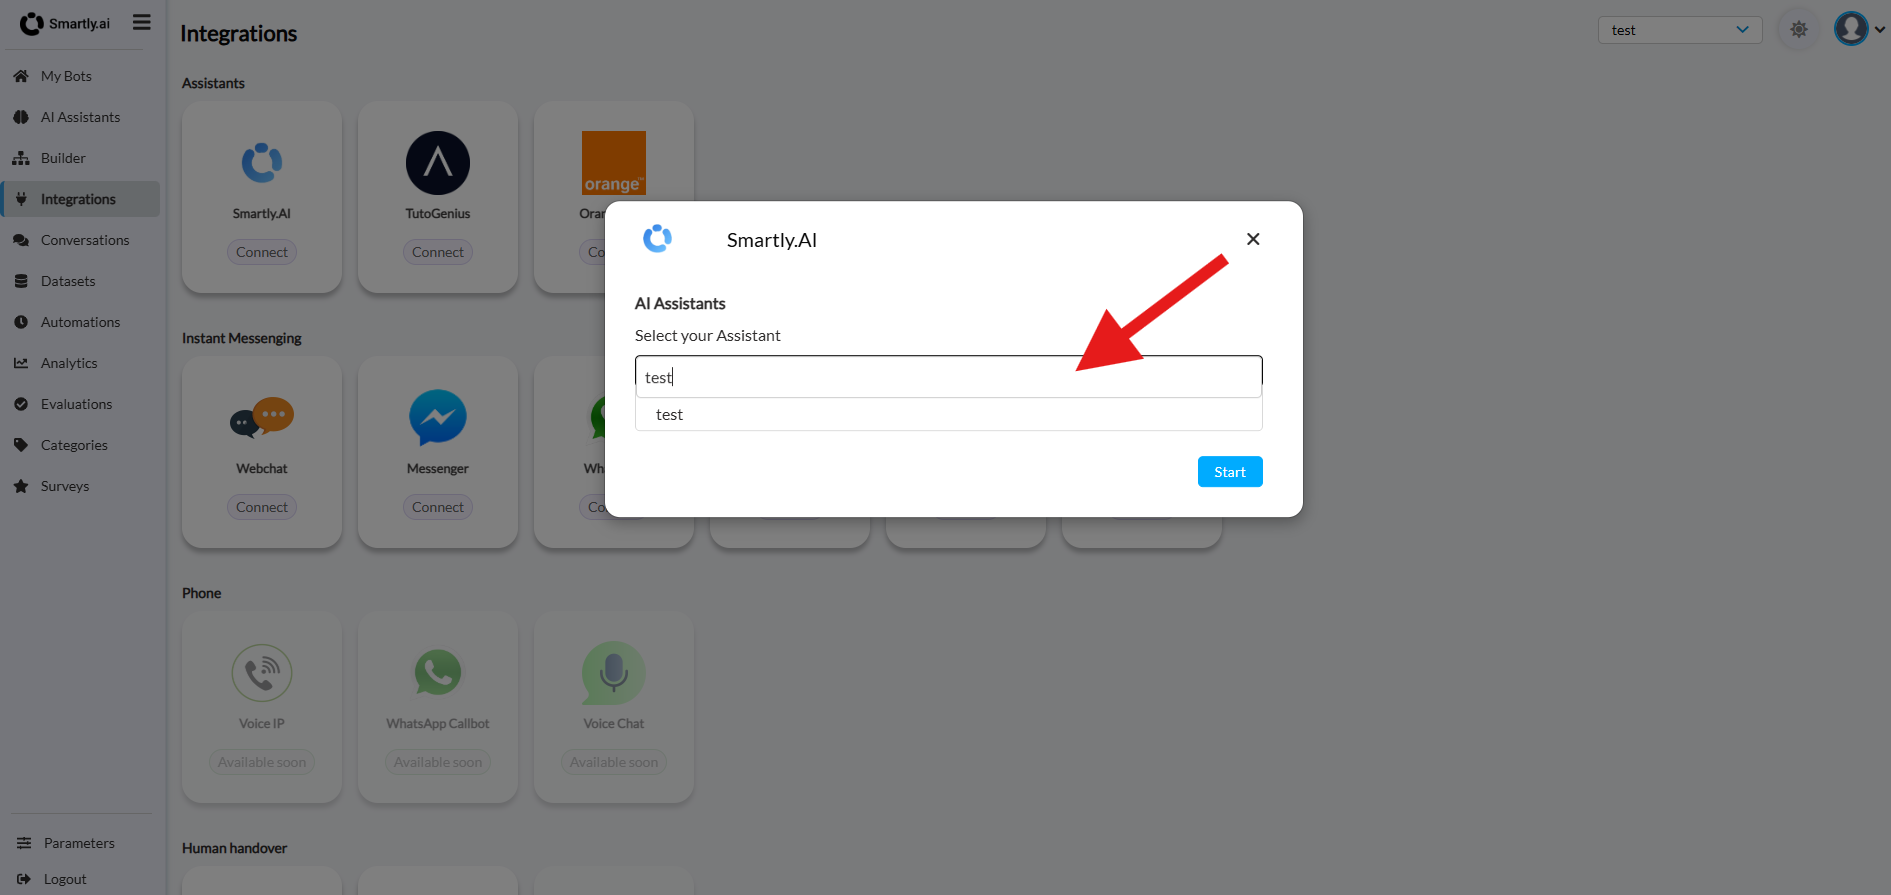
To integrate Gen AI with your bot, navigate to the "Integrations Module".
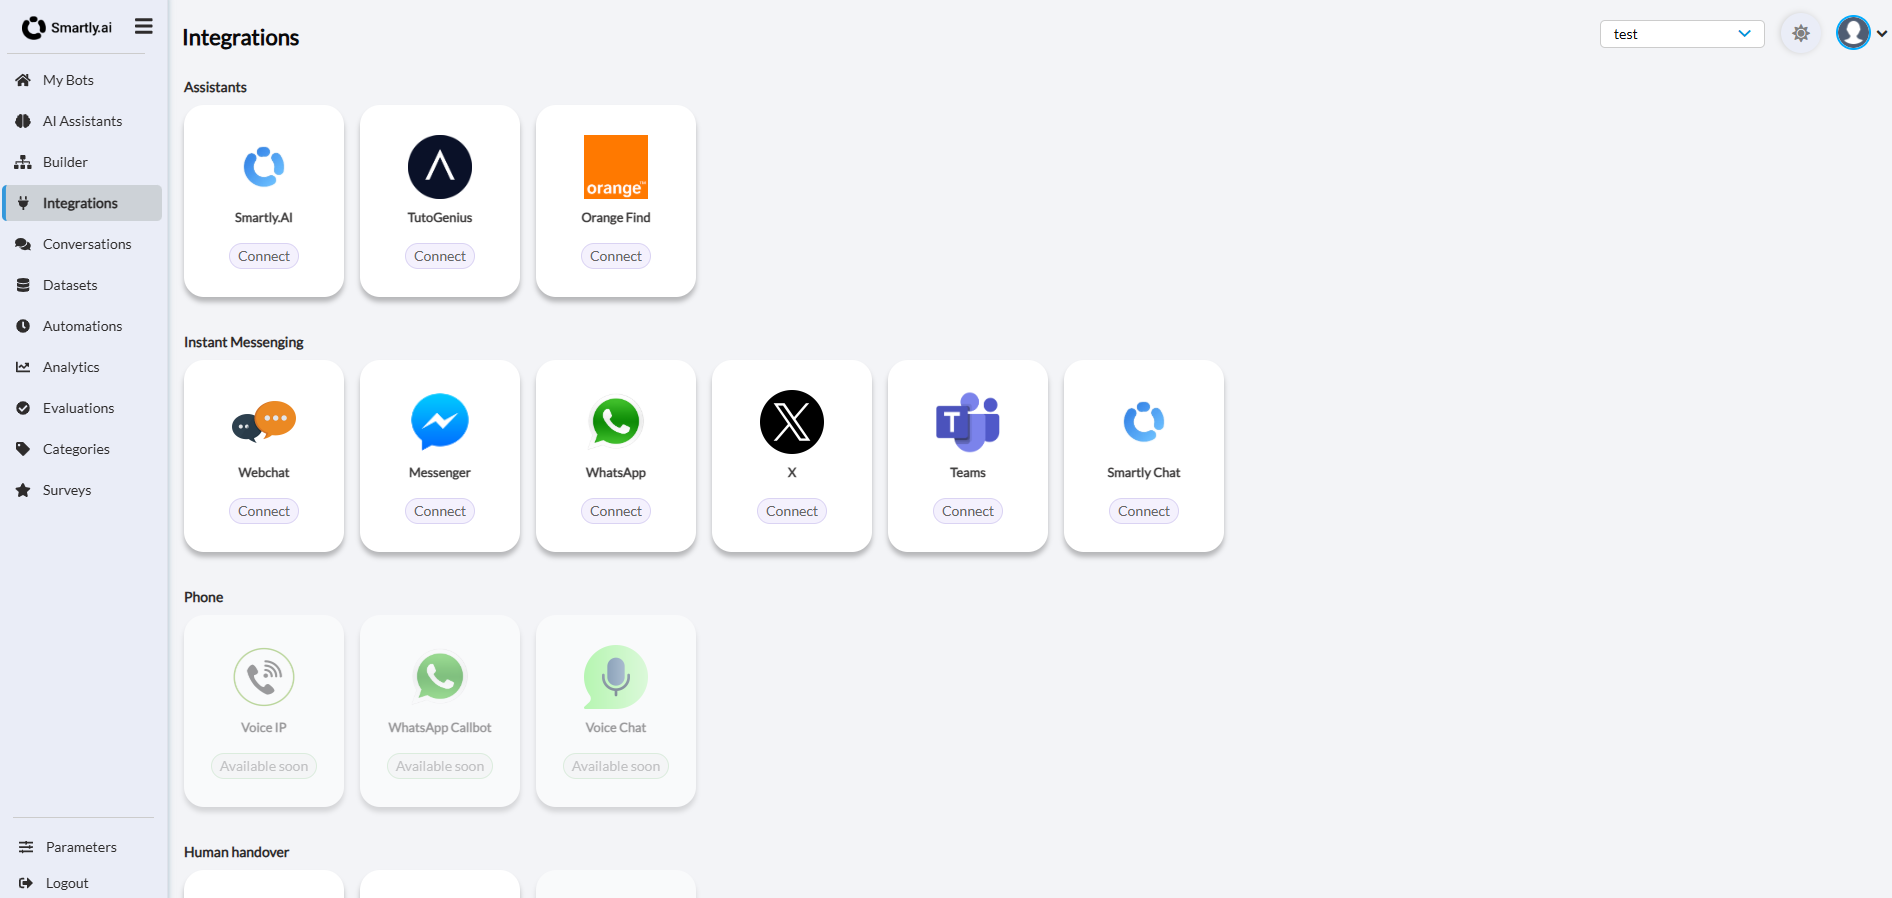
First lets connect your bot to the Gen AI Assistant, click on the Smartly.AI Assistant integration.
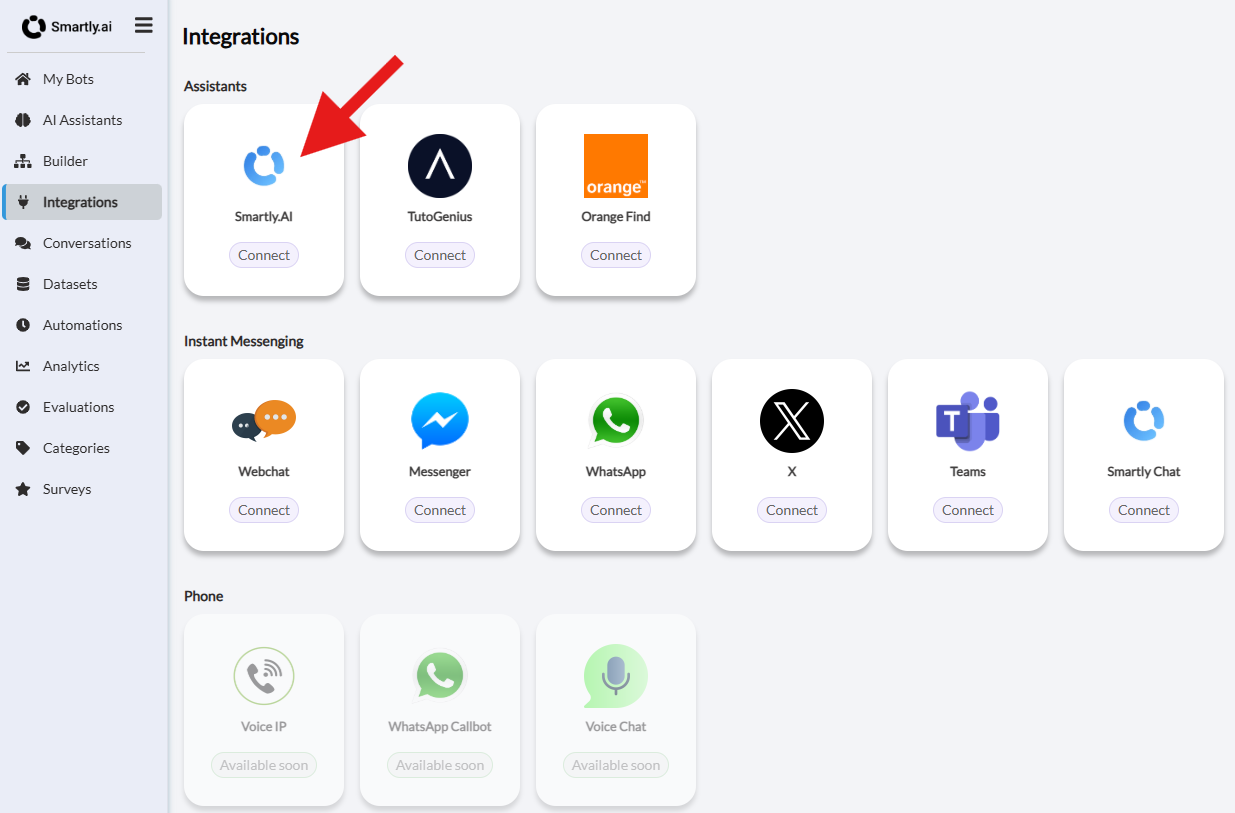
Then select your your prefered assistant and click on the ''Start button''
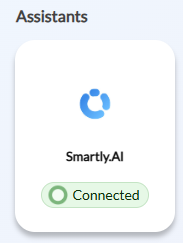
You should now notice that the integration is live with "Connected" as a status.
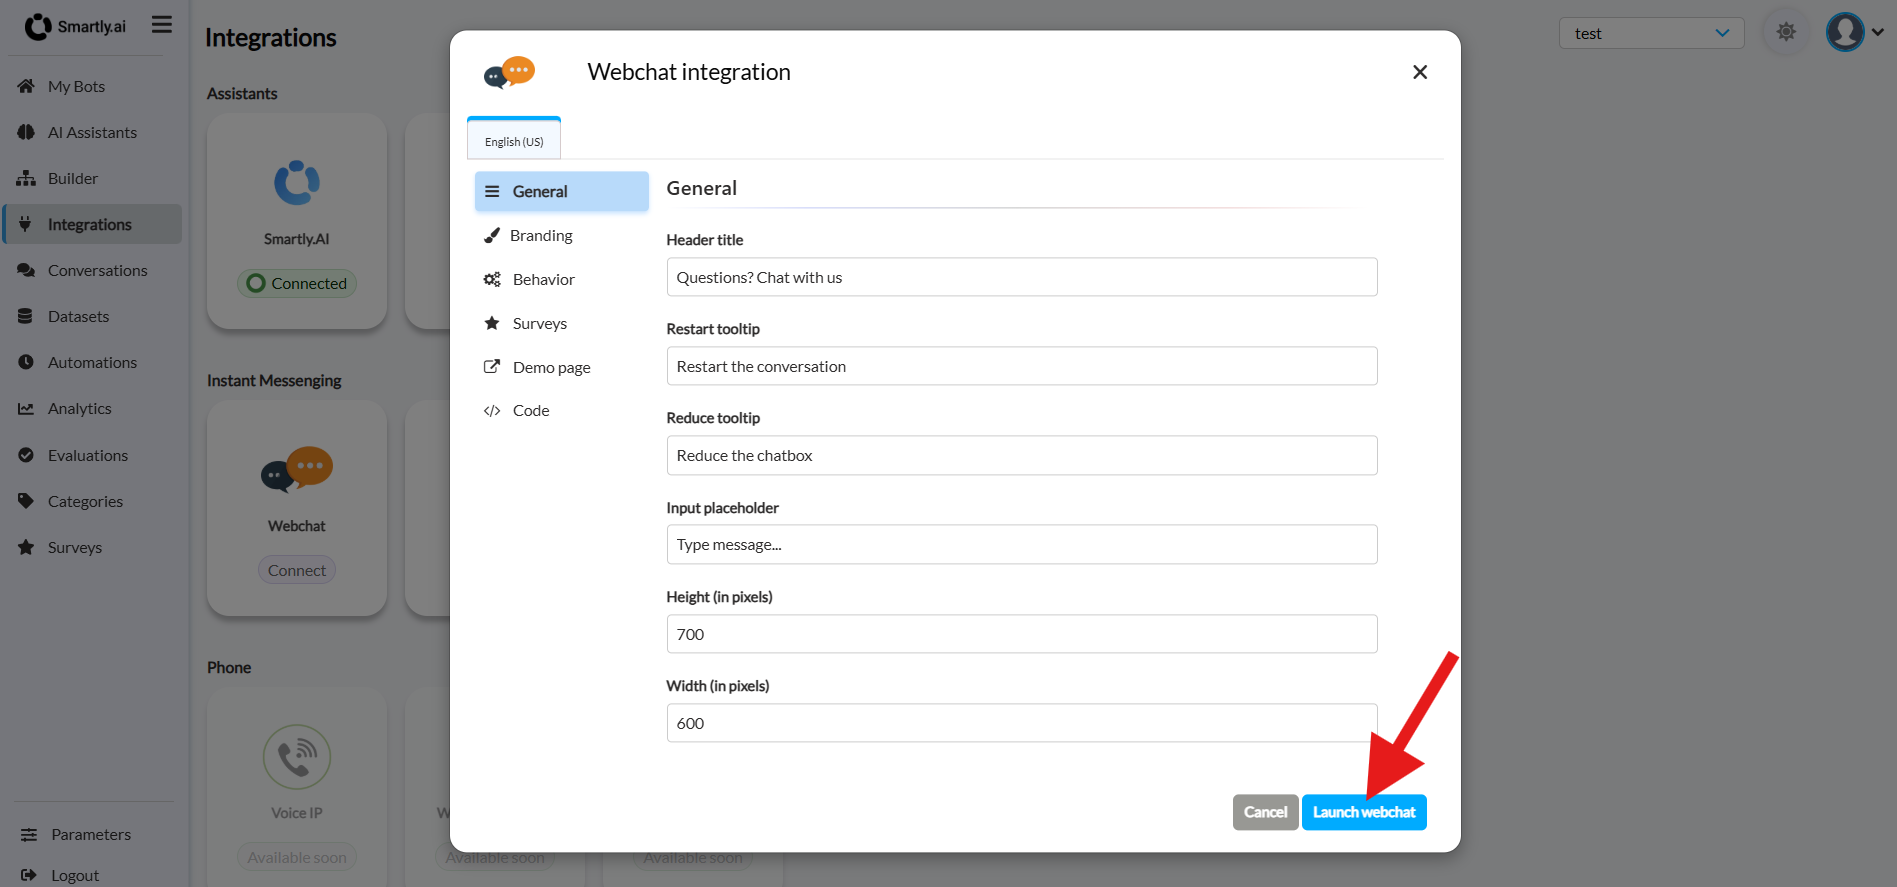
Lets try the Webchat integration
The simplest option to start with is the Webchat integration, click on it and you will be tradferred to a demo page.
For more on this, you can check the Integrations
Improve Your Gen AI
Improving your Gen AI-powered bot is an ongoing process. Here are some strategies to continuously refine its performance.
Conversation Review
Start by reviewing the conversations that your Gen AI has had. This will give you insights into what's working and what might need adjustment. If the bot's responses don't align with your expectations, you can revise them for better accuracy and user engagement.
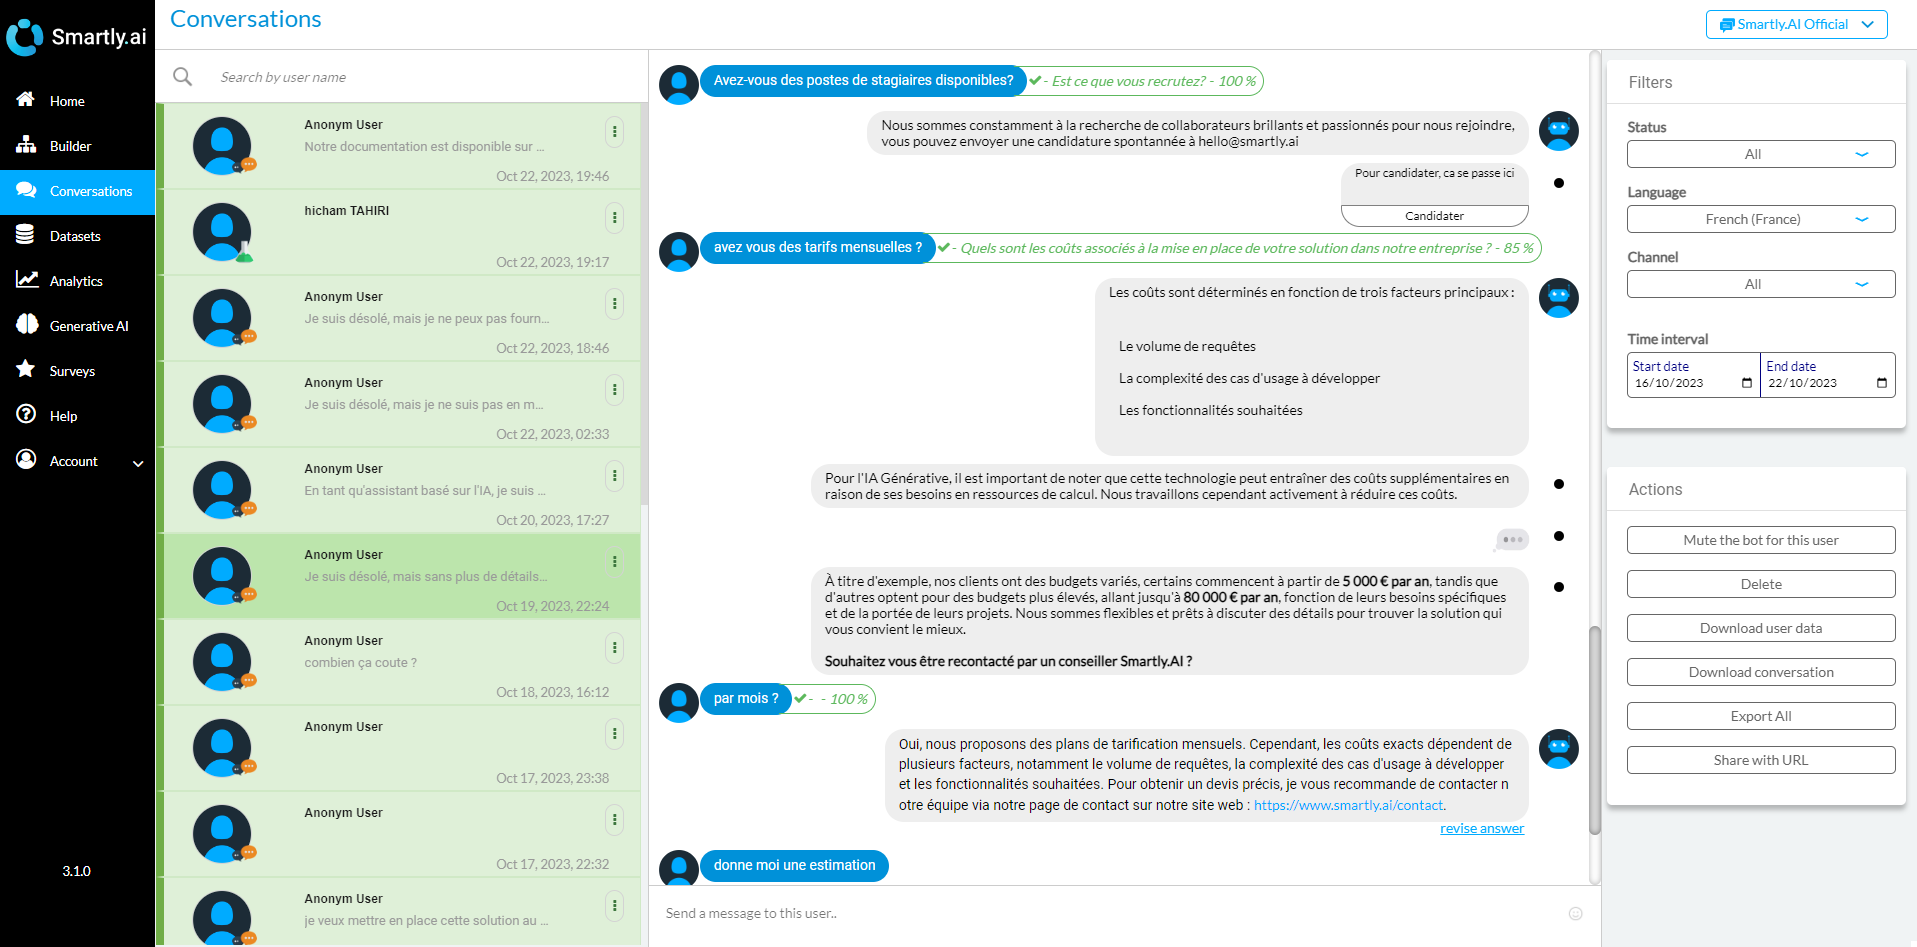
Monitoring Downvoted Responses
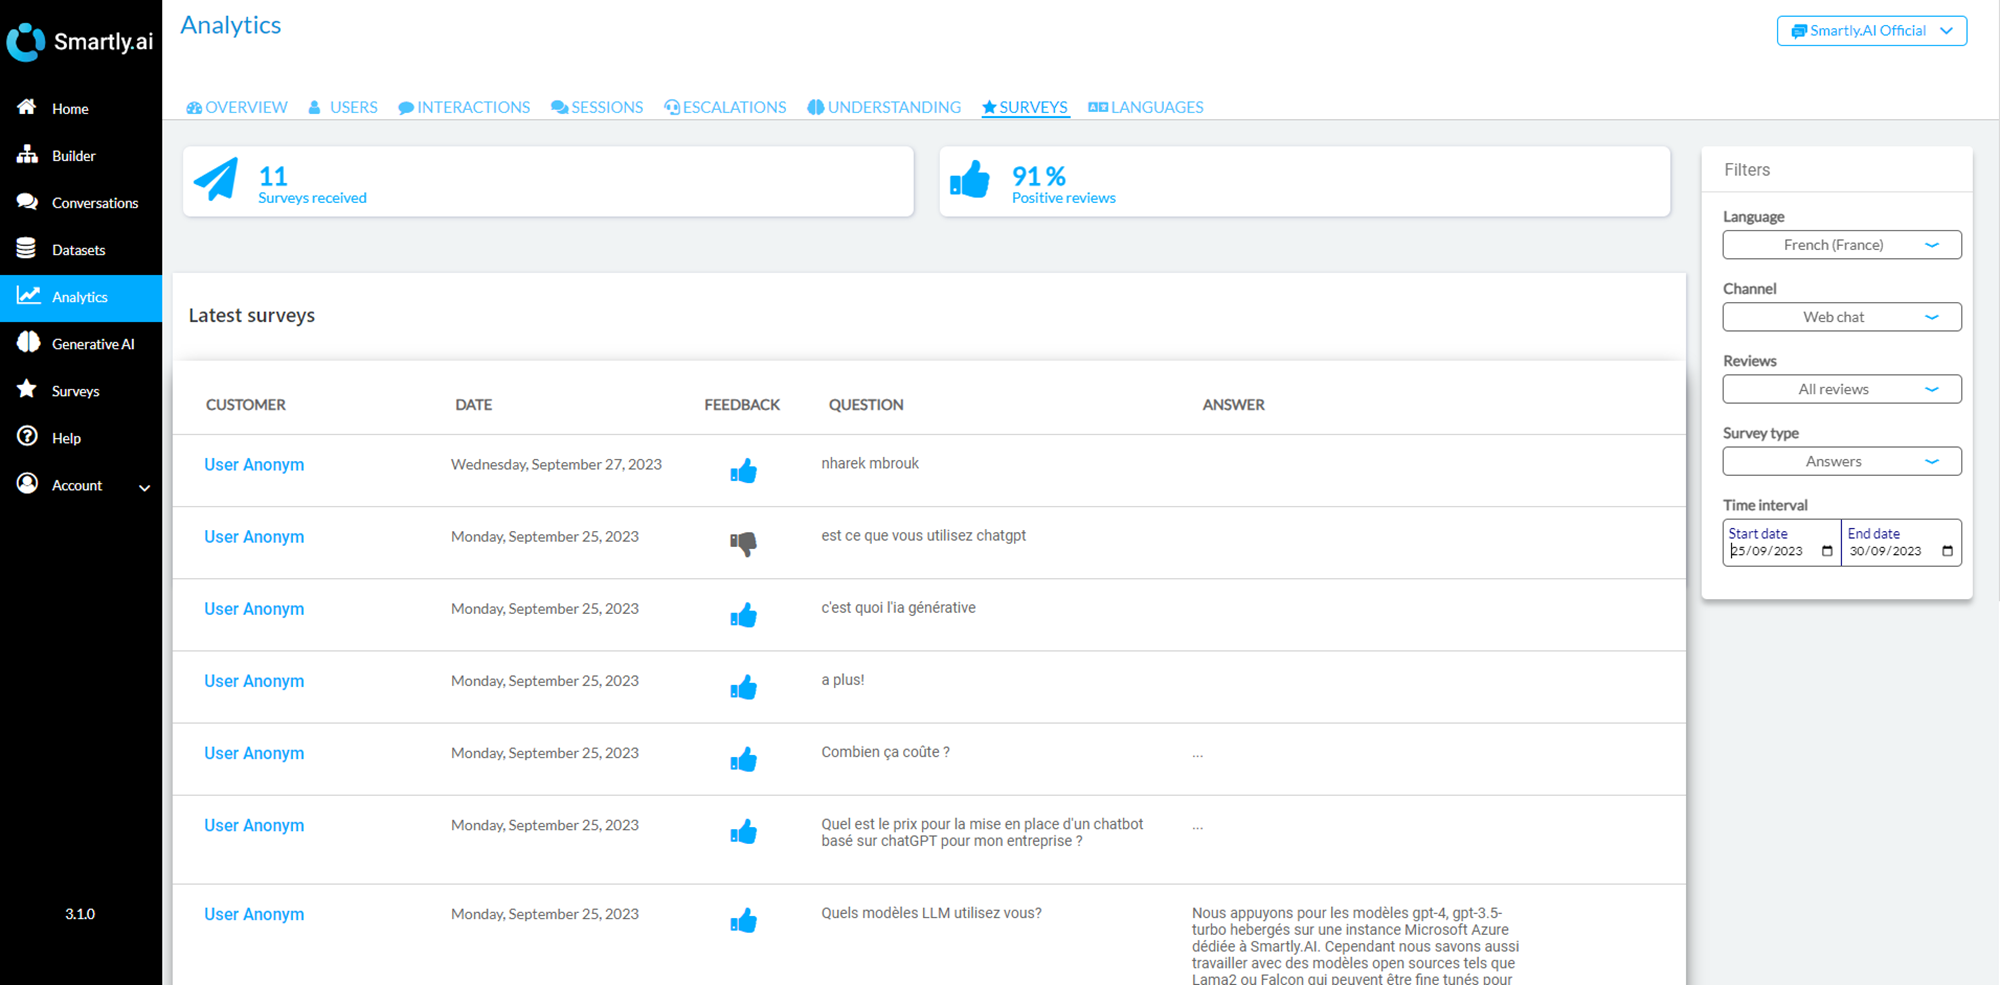
If you have enabled the "Surveys on Answers" feature, you'll begin to receive valuable user feedback. Make it a practice to regularly review downvoted or poorly rated responses. Revamping these answers is a straightforward way to improve your bot's behavior over time.
Pro Tip: Automated Evaluation AlgorithmWe are in the development phase of an automated evaluation algorithm. This feature aims to highlight potentially problematic answers, even if users haven't provided explicit feedback. Keep an eye out for this upcoming tool that will make quality control even more efficient.
Updated 7 months ago