Webchat
Your chatbot works great and want to integrate it to your website?
We get you covered with our native webchat integration.
How it looks like?
Here is some screenshots on how our off the shelf looks like on real websites.
On Desktop

Smartly.AI's webchat in a car manufacturer website

Smartly.AI's webchat in a retail banking website
On Mobile
And here is how these bots looks like on mobile devices.

Full responsiveness of Smartly.AI webchat
Love what you have seen so far? Let's see how you can get and customize yours now!
Where to find it?
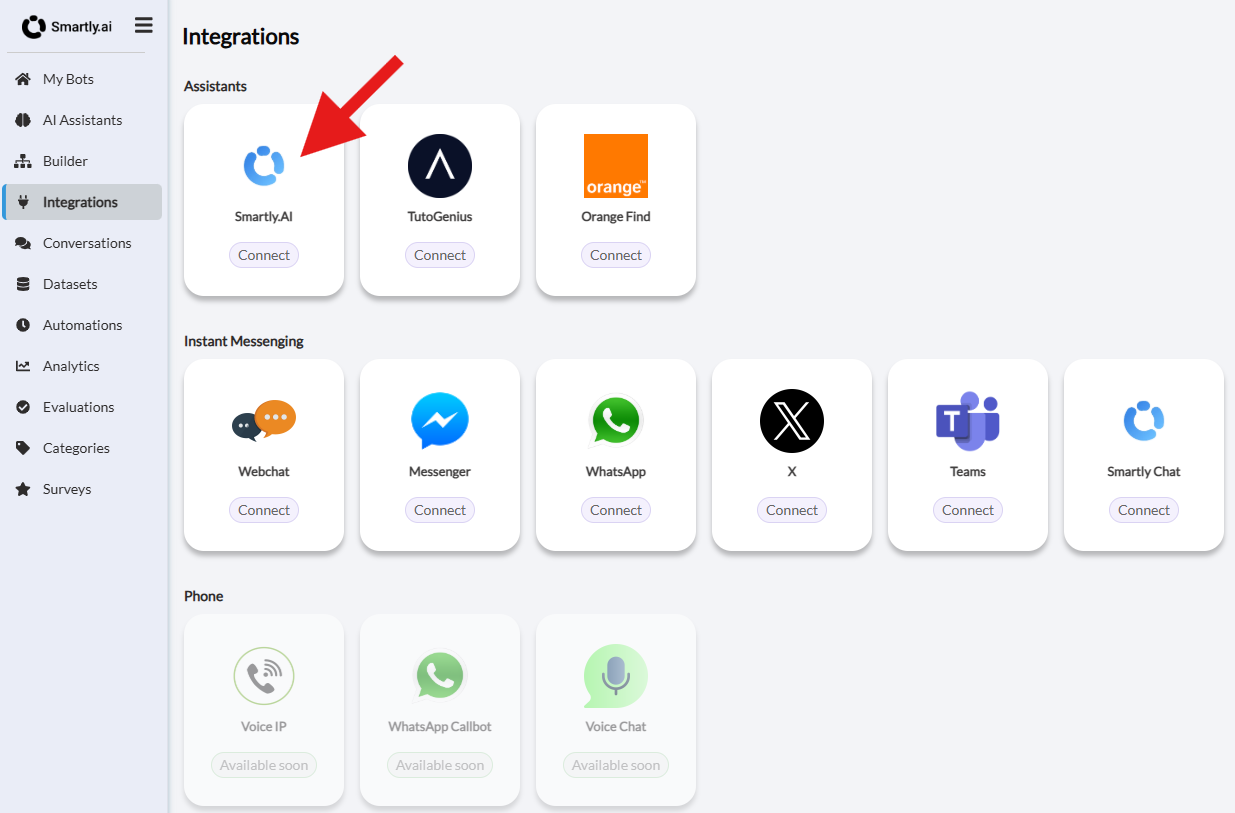
- From the main menu on the left, navigate to Integrations.
- In the top-right corner, use the search bar to find and select the specific bot you want to configure. This is a crucial step if you manage multiple bots.
- In the Assistants category, locate the Smartly.AI card and click Connect. A "Connected" status will confirm that your bot is now powered by your Gen AI Assistant.
A window will appear with everything you need to customize your webchat 🎅
If you are opening this menu for the website, you will notice that the Webchat service is turned off, so the first thing to do is to click on the Launch Webchat button.
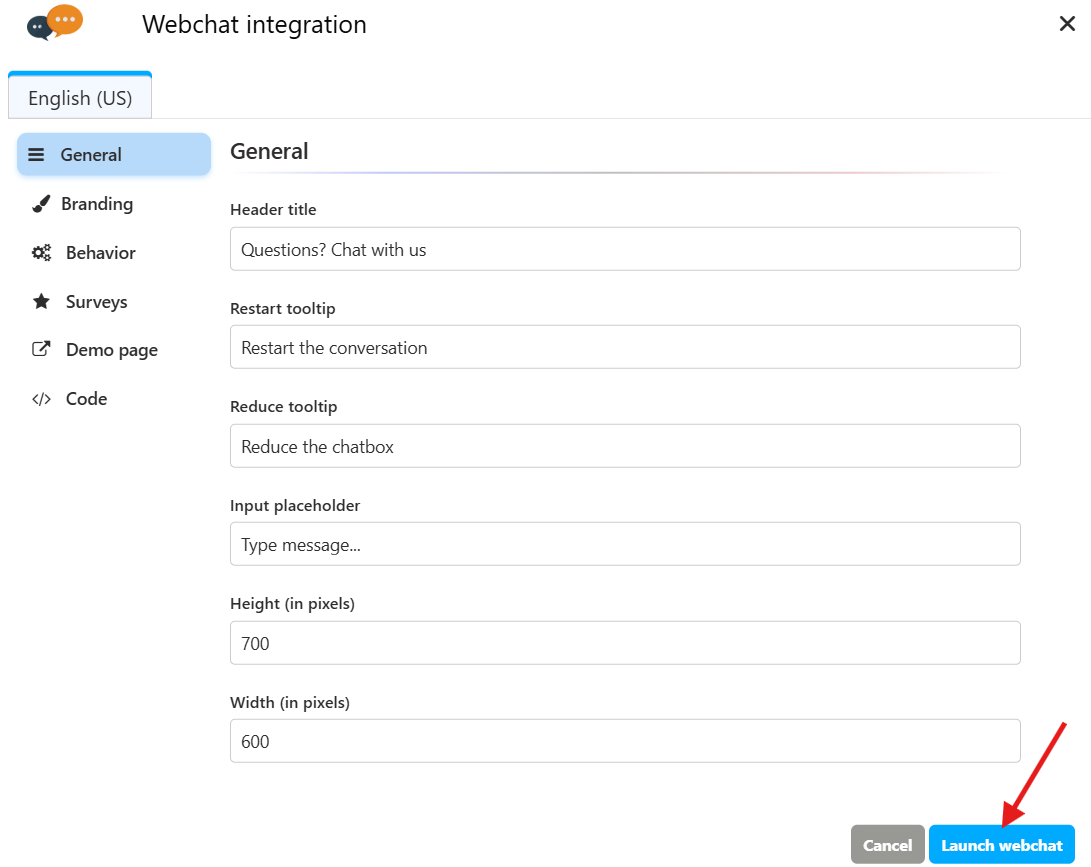
Click here to activate the webchat service for your bot.
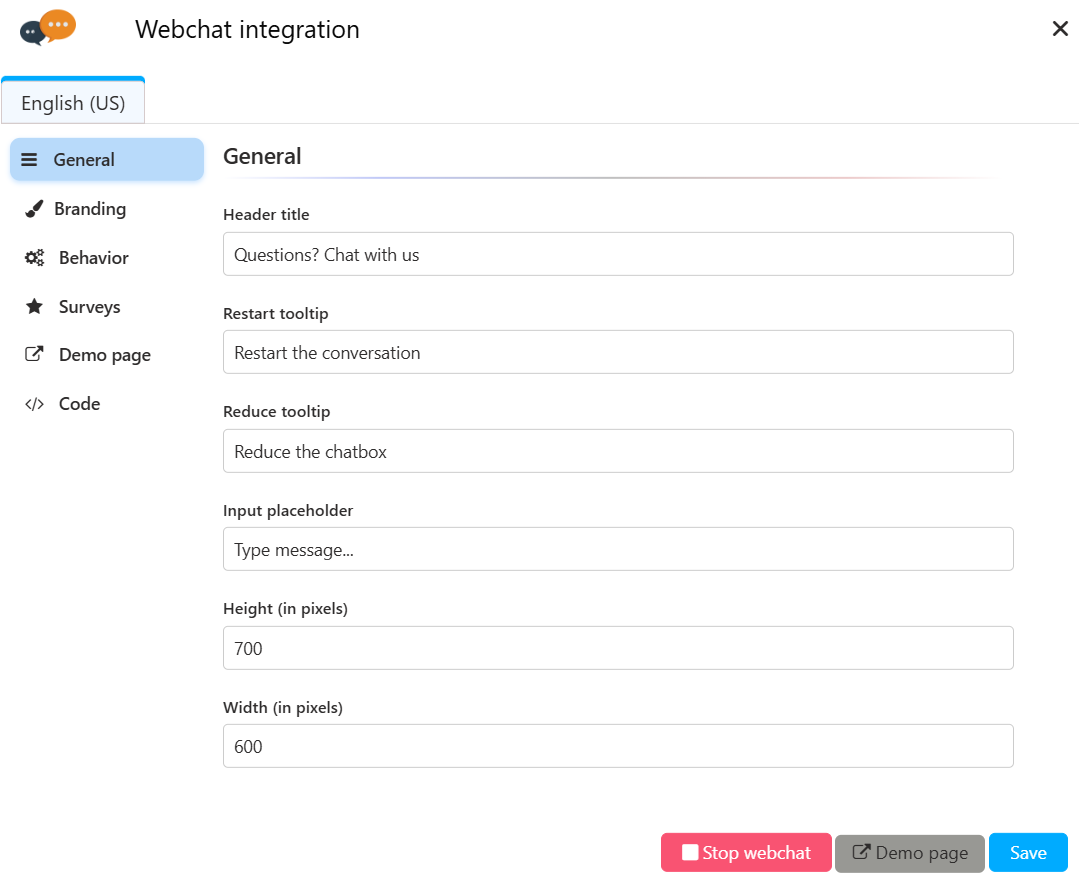
Once the service is launched, new controls appear
Once the service launched, you will notice 3 different control buttons on the bottom right:
Stop webchat: Allows you to stop the webchat service and hide it from a website until next launch.
This is very practical in case of maintenance for example.Demo page: Allows you to try your bot on a simple web page.Save: Allows you to save your configuration. Do it everytime you change something and refresh the target website in your browser to see them in the webchat.
Now that the service is up, lets go through the different sections to customize our webchat!
The Main settings section
The Basics
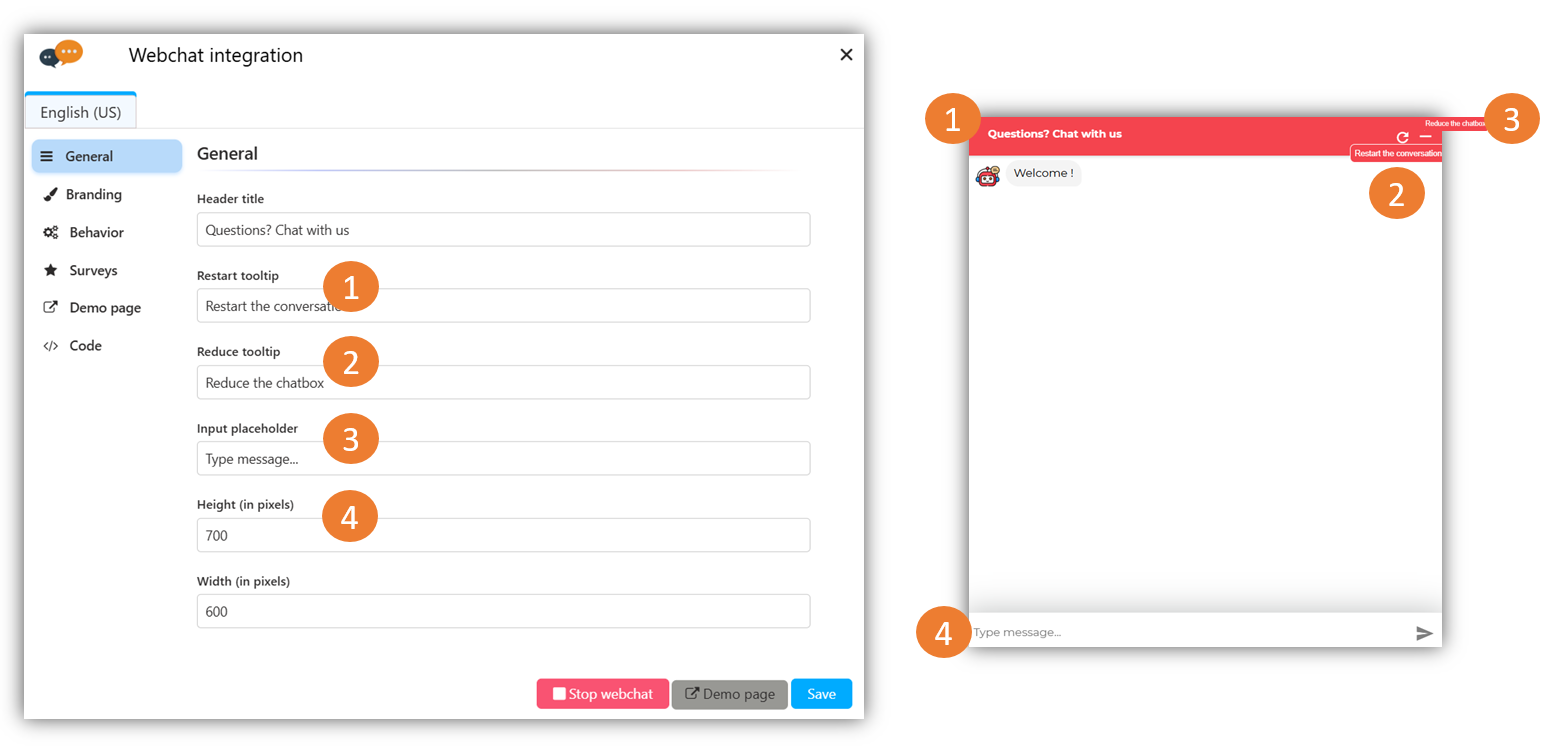
Head Title
Allows you to control the title of the chat box
Restart message
Allows you to customize the message showing when the user mouse goes on hover the restart button
Input placeholder
Allows you to control the message shown in the input field before the user start typing his message
Reduce tooltip
The text for the button to minimize the chatbox.
Bot Avatar
Allows you to customize the photograph of your bot avatar. Can be a JPG, PNG or GIF image.
The Colors section
Image that your website has a specific colort chart you want to follow.
We do offer many customizations from the integration, let's check them out.
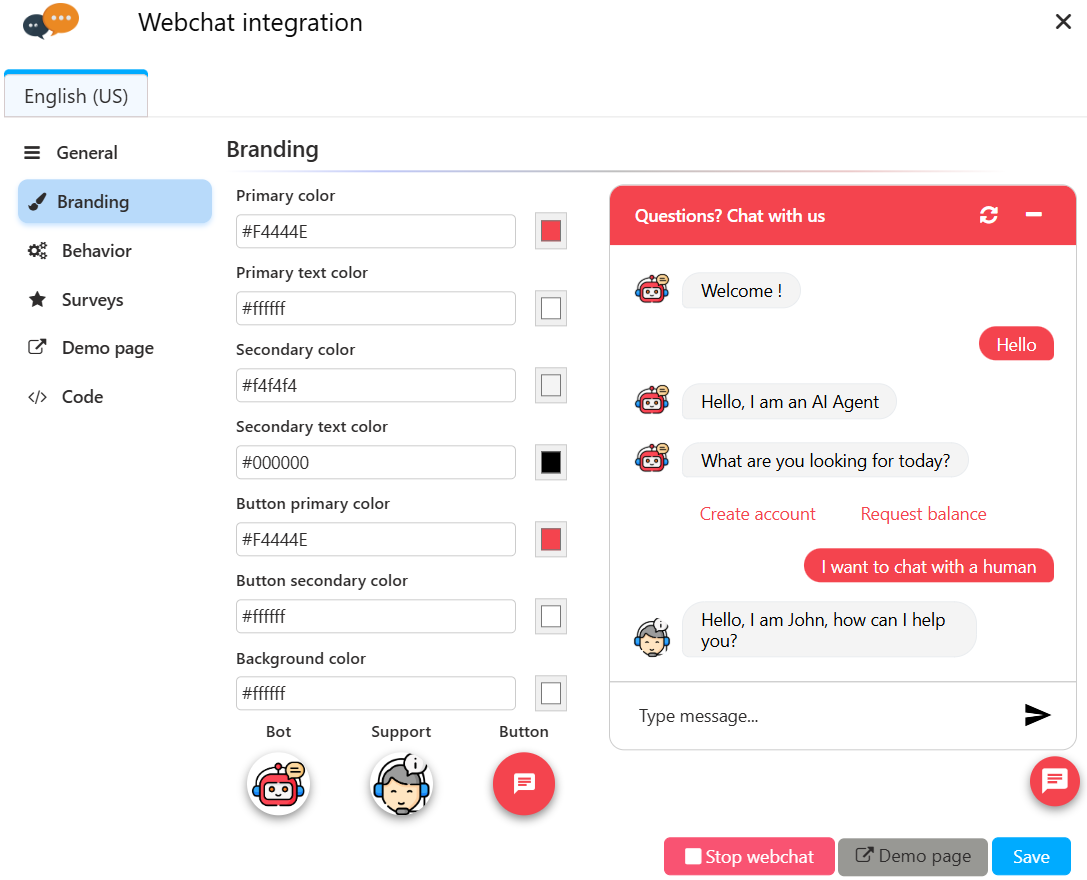
Color Customization
Primary color
Is the color of:
- the title bar background
- the user text background
- the chatbox opener button background.
Primary text color
Is the color of:
- the title bar text
- the user text
- the chatbox opener button icon.
Secondary color
Is the background color of the bot messages
Secondary text color
Is the text color of the bot messages
Button primary color
Is the color of:
- the background of the quick replies
- the background of the text buttons
- the background of the carousel buttons
Button secondary color
- the text color of the quick replies
- the text color of the text buttons
- the text color of the carousel buttons
Background color
The main background color of the chatbox
Icon & Avatar Customization
Bot: The avatar that appears next to all messages sent by the AI Assistant.
Support: The avatar that appears next to messages sent by a human agent during a handover. This helps the user clearly identify when they are speaking to a person.
Button: The icon used for the launcher button that users will click on your website to open the chat widget.
NoteWhen the mouse is on hover a button,
Button primary colorandButton secondary colorwill be inverted.
The Behavior section
Control how the webchat behaves when a user visits your website.

- Open on load?: If enabled, the chat window will open automatically for new visitors.
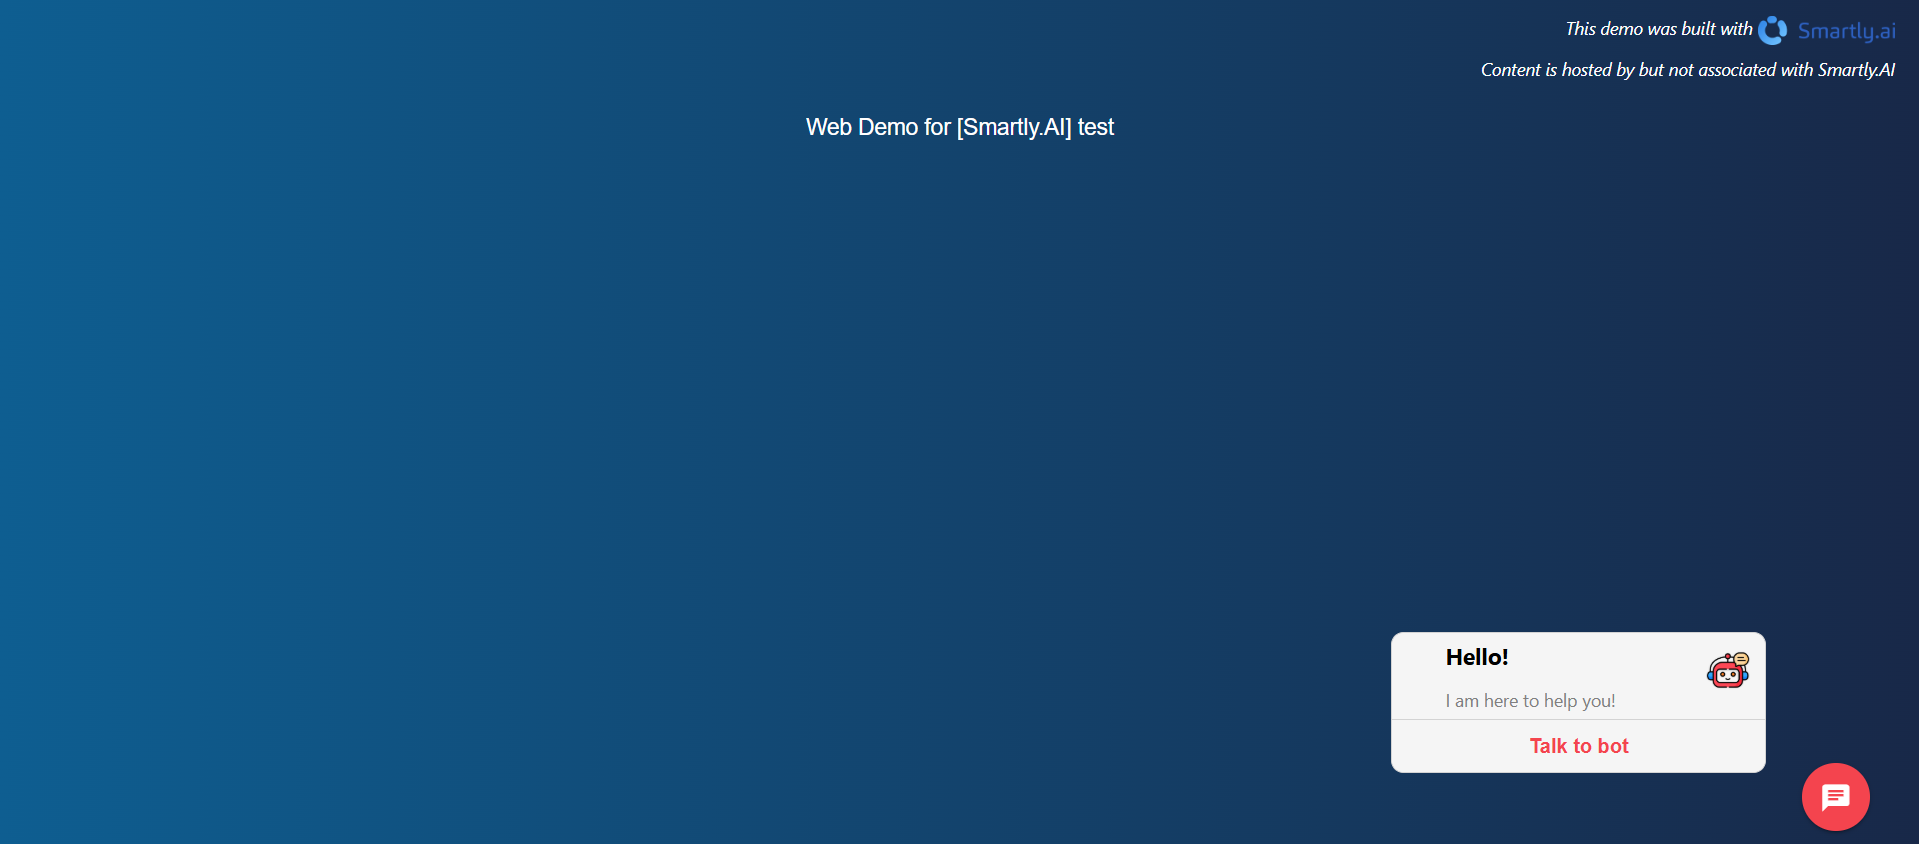
- Display a popup?: When enabled, this shows a small notification bubble to proactively engage visitors. You can customize its content:
Popup title: The main heading of the notification (e.g., "Hello!").
Popup description: A brief text to invite the user to chat (e.g., "I am here to help you!").
Popup button: The call-to-action text on the button (e.g., "Talk to bot").
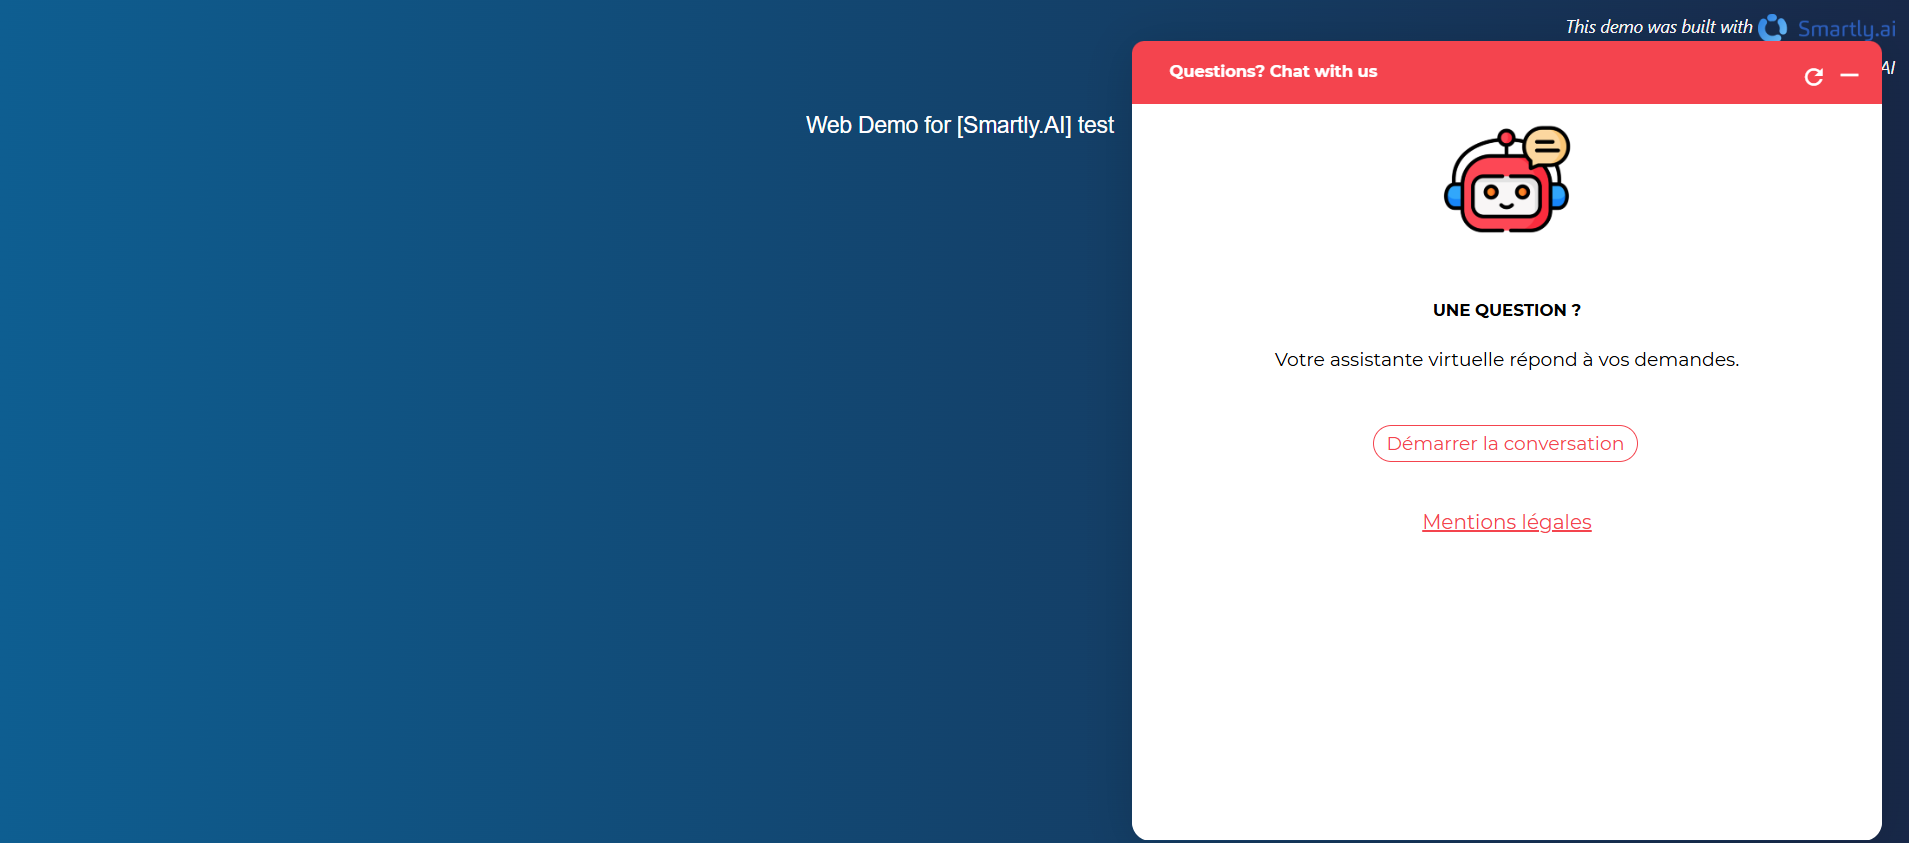
- Display a start window?: If enabled, a welcome screen is displayed inside the chat window before the conversation begins. This is ideal for presenting your assistant and setting expectations.
Title: The main title of the welcome screen (e.g., "UNE QUESTION ?").
Description: A text to describe what the assistant can do.
Button: The text for the button to start the conversation (e.g., "Démarrer la conversation").
Legal notice & Legal notice link: You can add a link to your privacy policy or terms of service.
- Display a closing confirmation window?: When enabled, this asks users for confirmation before they close the chat window, preventing accidental closures.
Message: The question to ask the user (e.g., "Do you really want to leave?").
Confirmation text button: The text for the button that confirms the action (e.g., "Yes").
Deny text button: The text for the button that cancels the action (e.g., "No"). - Show history?: Allows returning users to see their previous conversation.
Disable the display of history after a certain time: You can set a time limit in hours after which the history will be cleared for the user. - Show Footer?: If enabled, a customizable footer is added to the bottom of the chat window.
Text or HTML to show: You can add plain text or HTML content, perfect for company branding or important links. - Max input length: Limits the number of characters a user can type in a single message.
- Authorized Domains: A crucial security feature. Enable this and list the domains where your webchat is allowed to appear to prevent unauthorized use.
Drive engagement with a popupFrom our experience, a well crafted popup can drive more engagement with your chatbot.
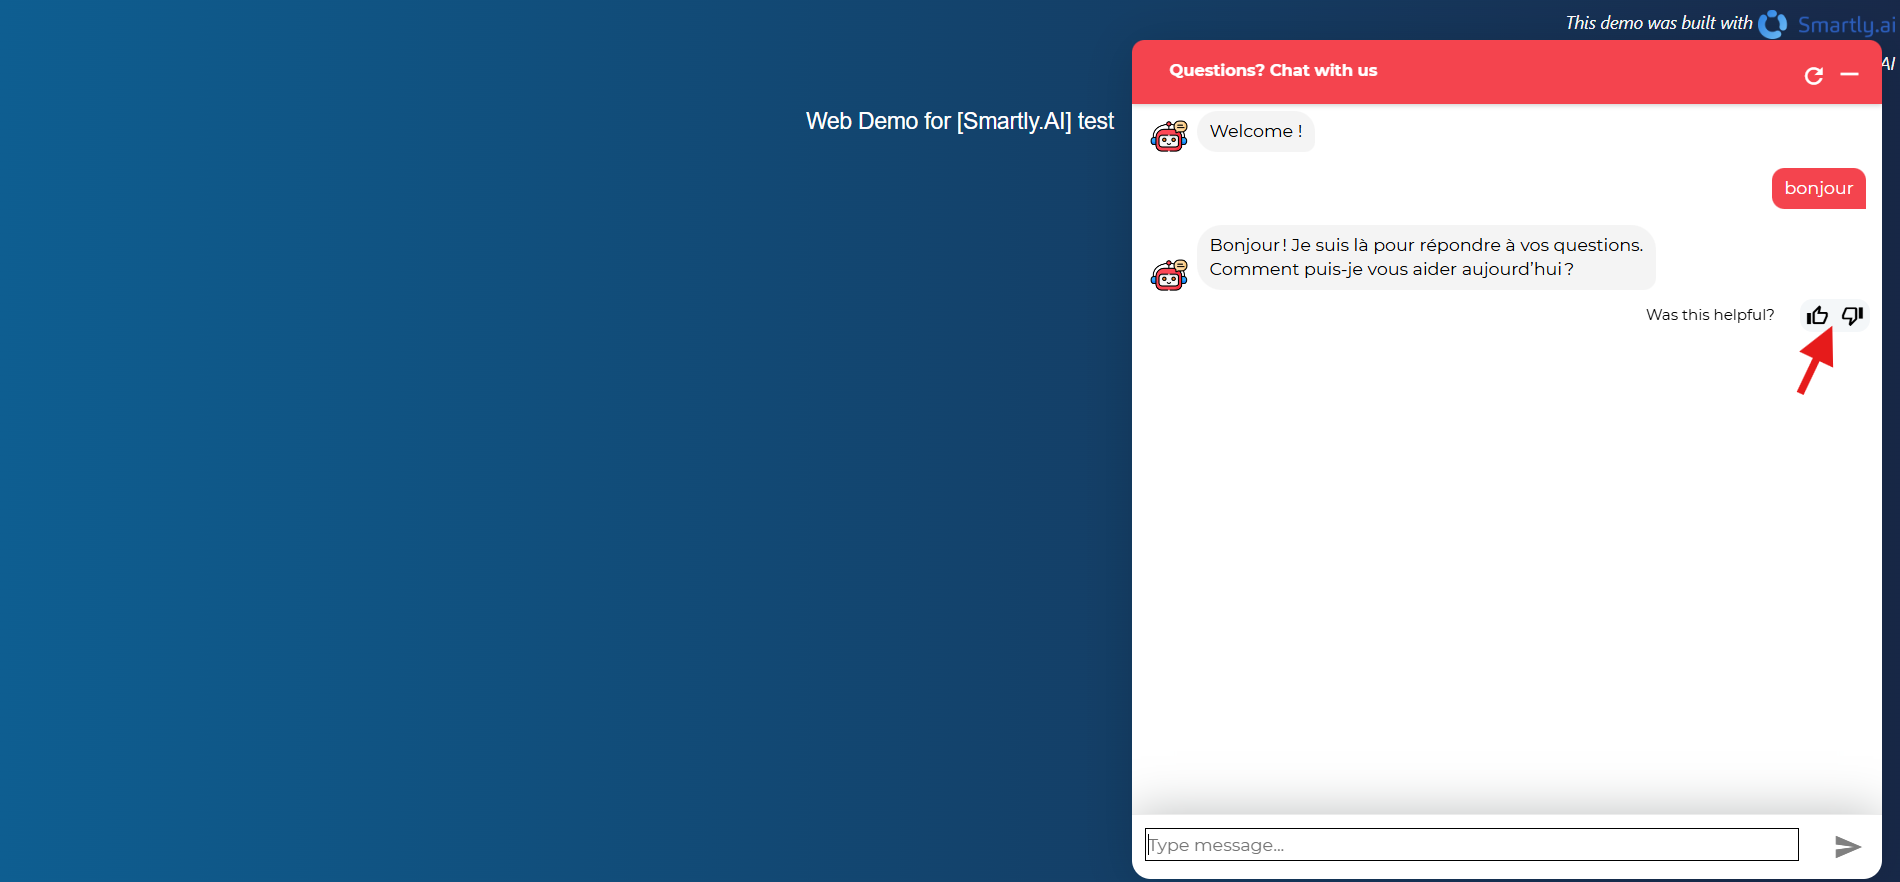
Surveys Tab
Gather valuable feedback from your users directly within the chat.
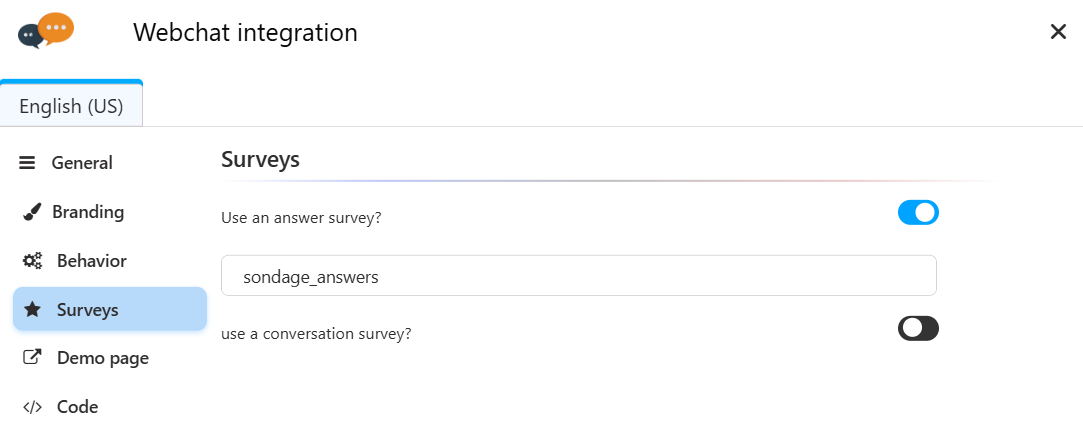
- Use an answer survey?: Asks users to rate the quality of specific answers (e.g., with a thumbs up/down).
- Use a conversation survey?: Asks for feedback on the overall quality of the conversation once it ends.
The Demo page section
In order to give you a quick look at the final result of your webchat before it goes in production, the platform allows you to play with your bot on a web page created and hosted automatically for you.
Here is what the Demo page looks like.

The demo page... Launch it, try it, break it, fix it share it.. Technologic.
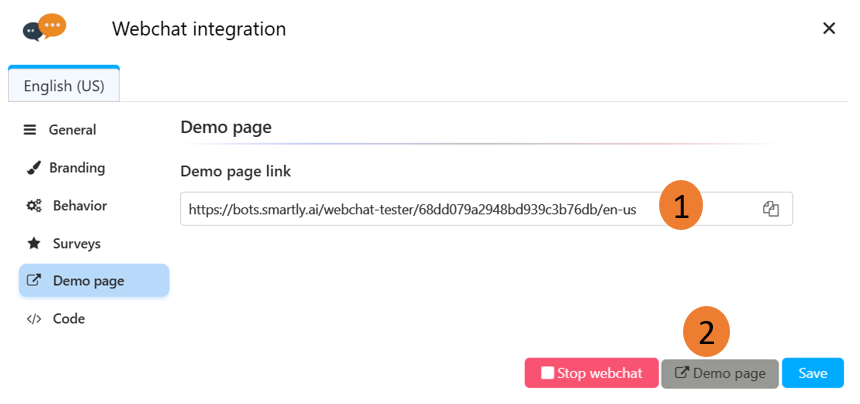
To activate a demo page for your bot:
- Make sure you have launched the webchat service for this bot
- Click the Demo Page section like shown below then open the url provided (1)
- Or click on the
Demo Pagebutton (2).
Your Demo is ready!
Your webchat demo is easy to shareHappy with what you have built, share it!
You can send the demo page link to your colleagues, beta testers, customers,...
They will be able to chat with your bot with no other requirement than having an internet connection🕺
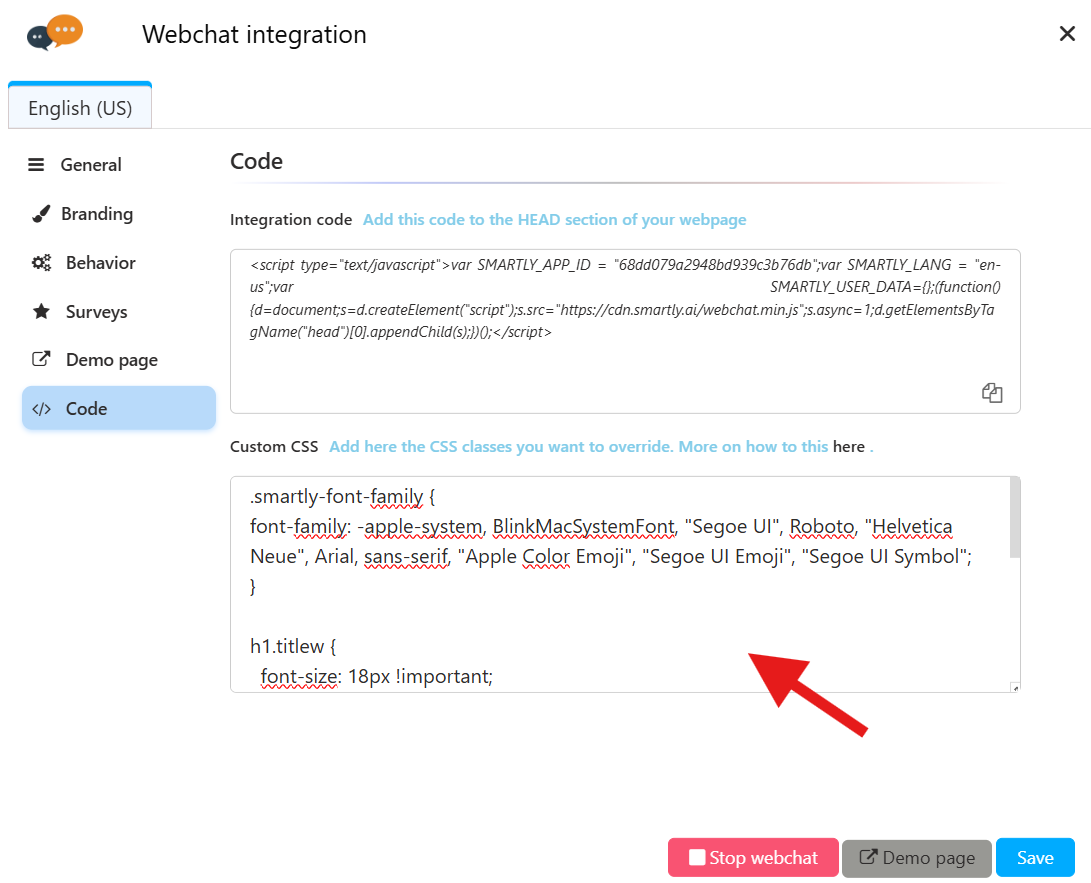
The Code section
This final tab provides everything you need to deploy the webchat on your website.
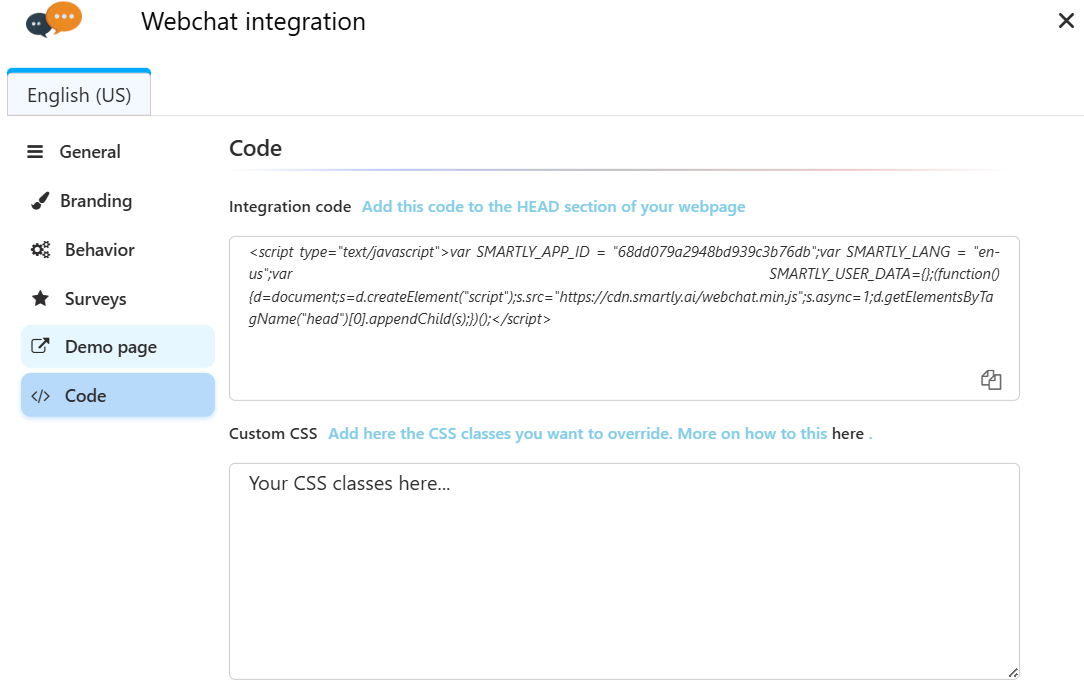
This code should go to the HEAD section of your website
Integration Code
In this section you will a very important piece of code, wich is basically on line of javascript that will add your chatbot to any website 😎
The integration code is available in the first field of the Code section.
The best place for the integration codeThis code should go to the HEAD section of your web site.
Custom CSS
While we do offer a generic and configurable webchat, you can can go further in customizing it so it can perfectly match the design of your website.
To so, here is the steps you can follow:
1/ Inspect the CSS code of the element of the webchat you want to change
In this case, we want to change the shape of the quick replies from rounded to squared

In this example, we will change the quick replies shape to rectangular
2/ Change the code until you get the desired result
3/ Copy paste the modified classes into the Custom CSS field of the Webchat integreation.
Hit save.
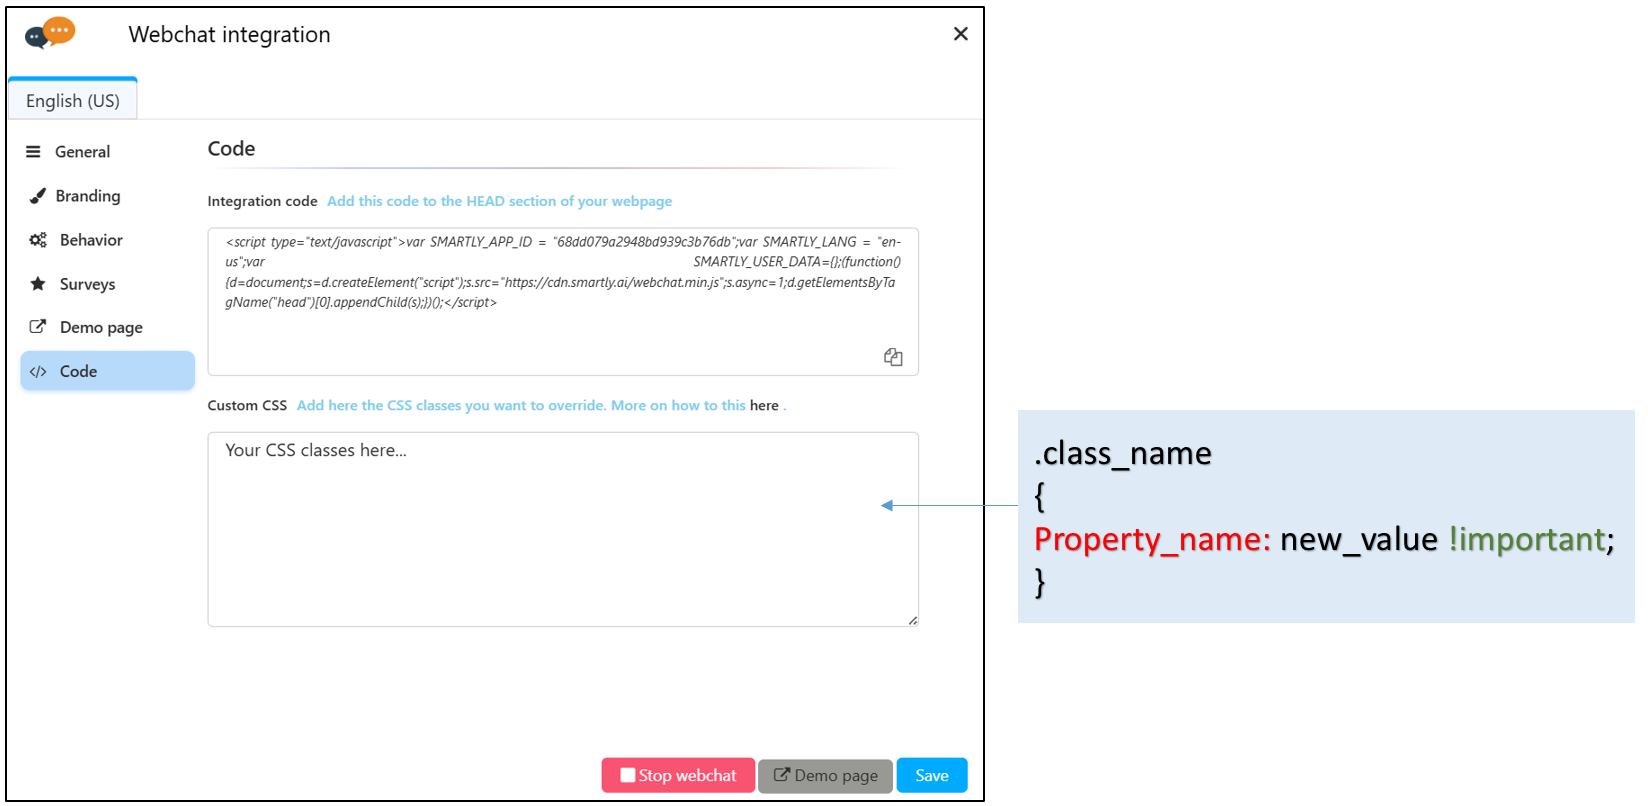
Add the CSS Class(es) you want to override here
ImportantDon't forget to add the
!importantinstruction so you new class will override the old one.
4/ Refresh the your demo page, your changes are live!
Customizing the webchat font
In the process of design uniformisation, it can be interesting to use the webxite font family in your chatbox.

Here is how you can customize the font of your webchat.
You can try yourself by adding the following code in the CSS section of your webchat integration:
@import url('https://fonts.googleapis.com/css2?family=Metal+Mania&display=swap');

.smartly-font-family {
font-family: 'Metal Mania', cursive !important;
}
If you have a custom font, change the url and font family name in the code below.
Don't have a custom font yet? You can find many fonts in this website.
Updated 10 months ago