Voice Chat
Voice Chat integration allows you to integrate voice-based conversations into your website, enabling natural spoken interactions with your AI assistant.
Getting Started
Step 1: Navigate to Your Bot
Go to My Bots from the left sidebar to see all your available bots.

Locate the bot you want to connect to Voice Chat integration and click the "Open Integration" button (pencil icon circled in red). This will take you to the integrations page for that specific bot.
Step 2: Select Your Bot in Integrations
Once in the Integrations page, ensure the correct bot is selected in the dropdown at the top right.
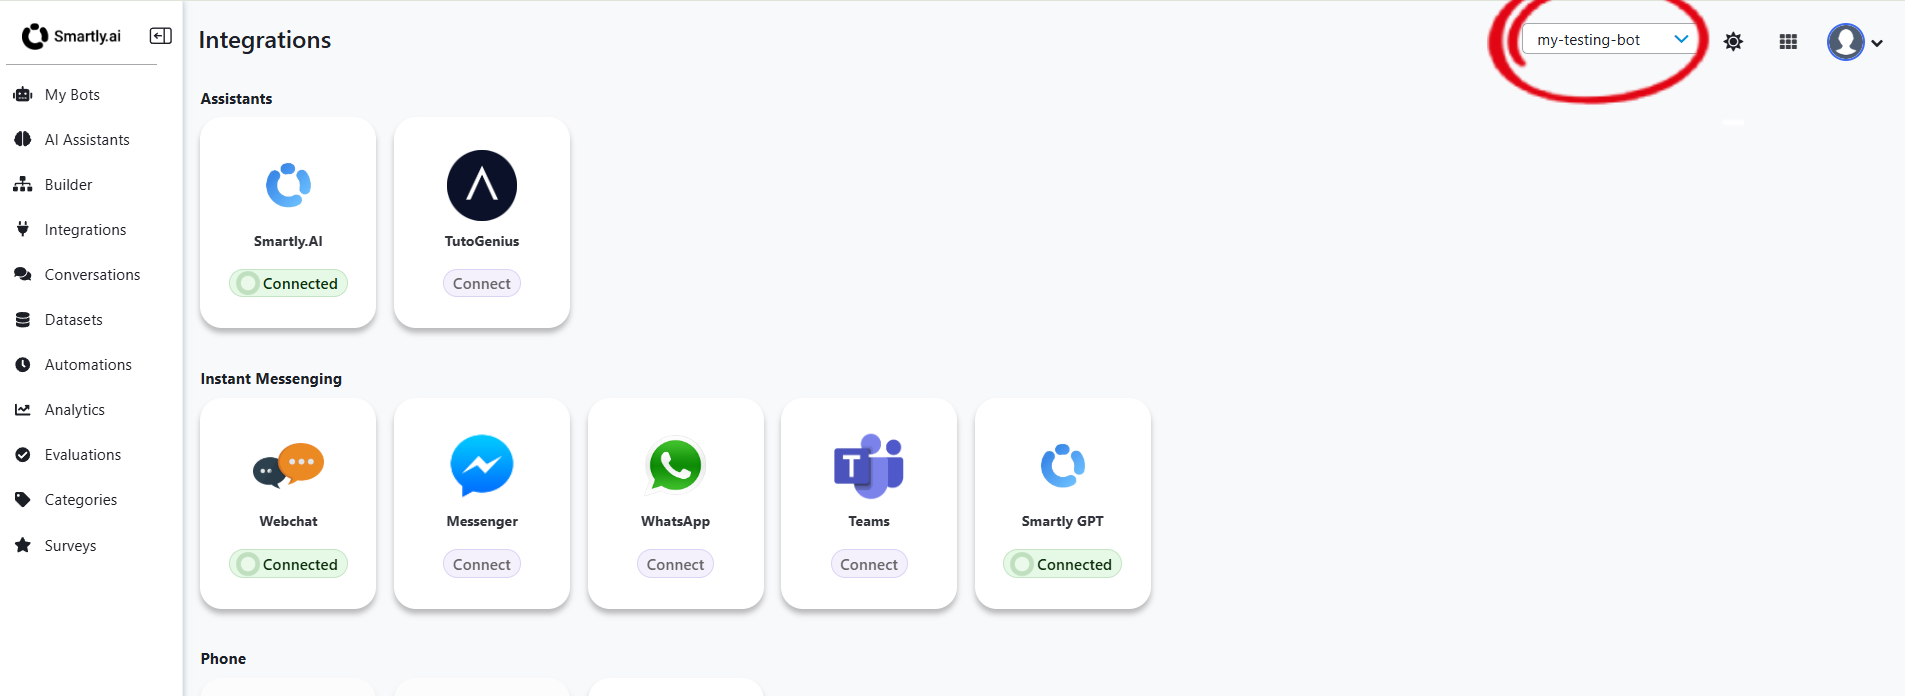
Verify that your bot name (e.g., "my-testing-bot") is displayed in the dropdown selector (circled in red). This ensures all integration configurations will be applied to the correct bot.
Step 3: Open Voice Chat Integration
Scroll down to the Phone section and click on the Voice Chat integration card.
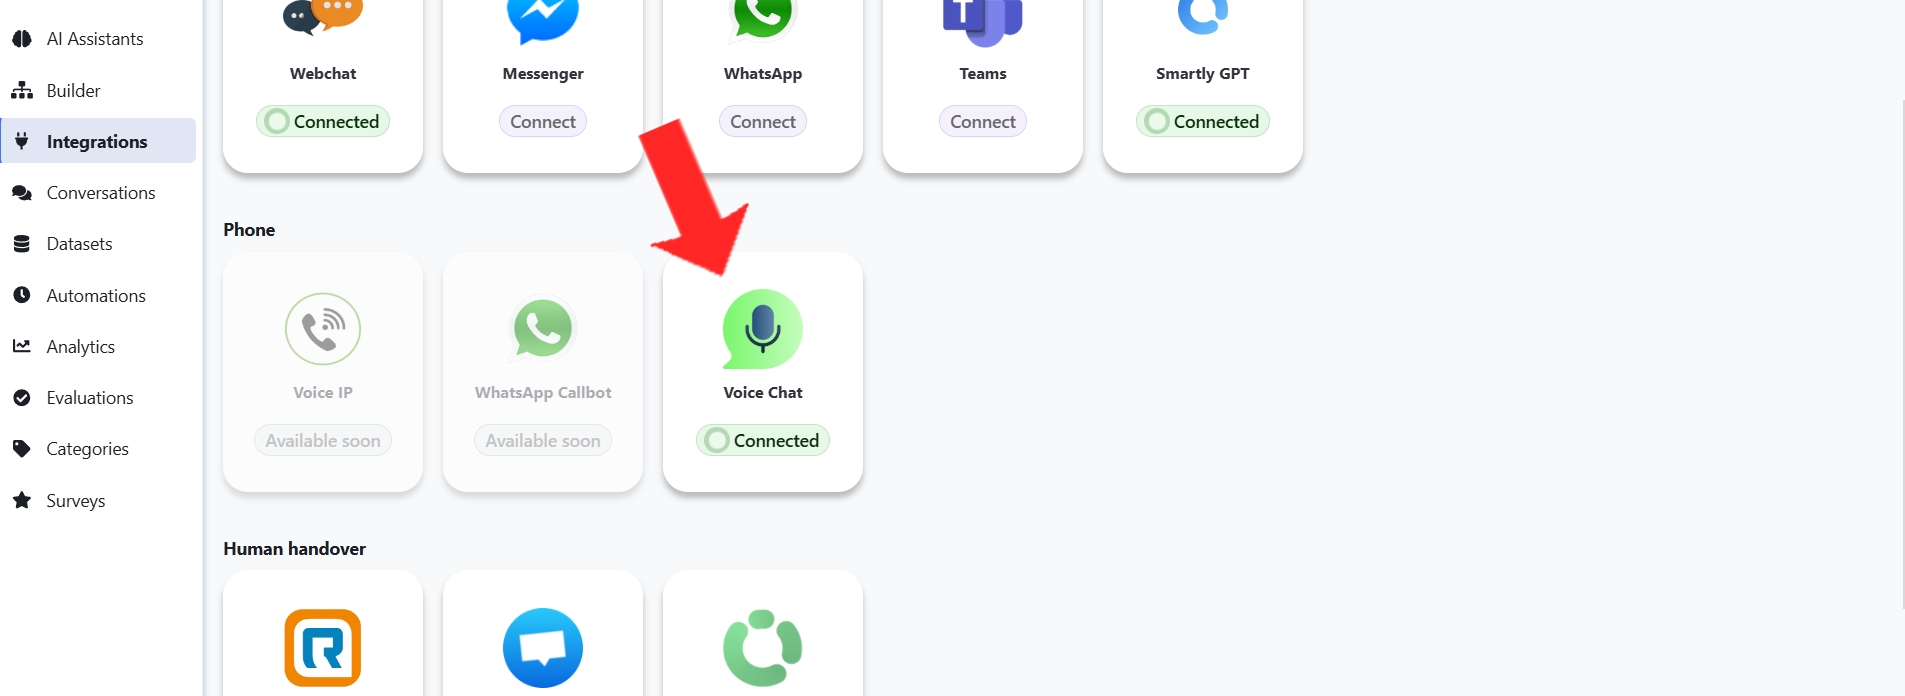
The Voice Chat card shows a microphone icon and will display "Connected" status if previously configured. Click on the card to open the configuration modal.
Step 4: Configure General Settings
The Voice Chat integration modal opens with the General tab selected by default.
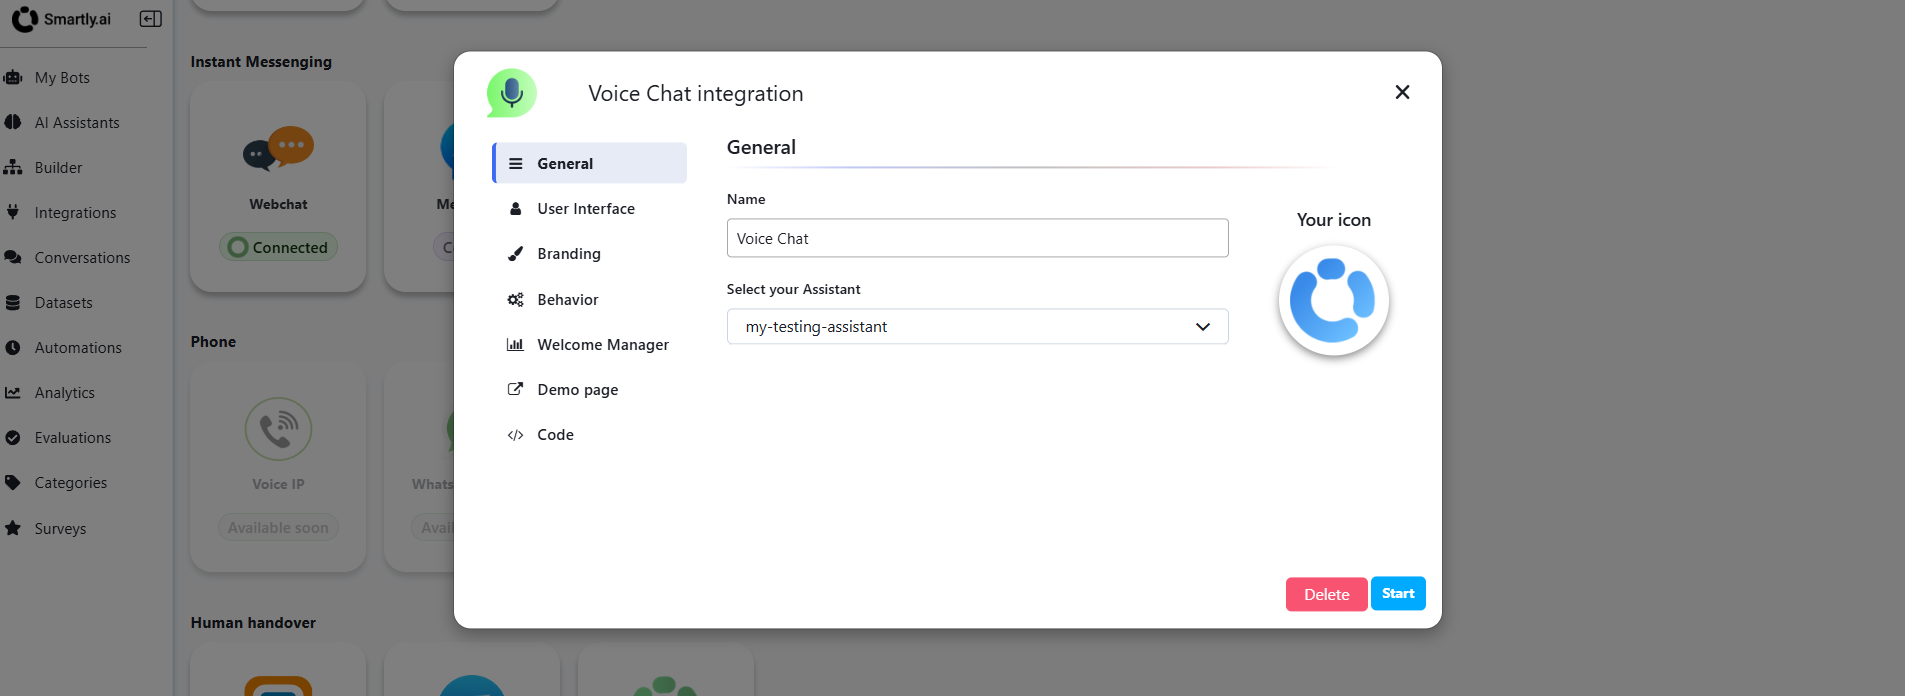
Configure the following settings:
Name
- Display name for your Voice Chat integration
- Default: "Voice Chat"
- This name appears in your integration list
Select your Assistant
- Choose which AI vocal assistant will power the voice interactions
- Select from your configured assistants
- This links your voice model deployment to the Voice Chat integration
⚠️ Important:
You must have created a vocal assistant before configuring Voice Chat integration. If you haven't created one yet, see the AI Vocal Assistants guide.
Your icon
- Upload a custom icon for the voice chat interface
- Displayed to users during voice interactions
- Recommended size: 256x256px, PNG format
Once configured, click "Start" to activate the Voice Chat integration for your bot.
Step 5: Customize User Interface
Navigate to the User Interface tab to customize the appearance of your voice chat widget.
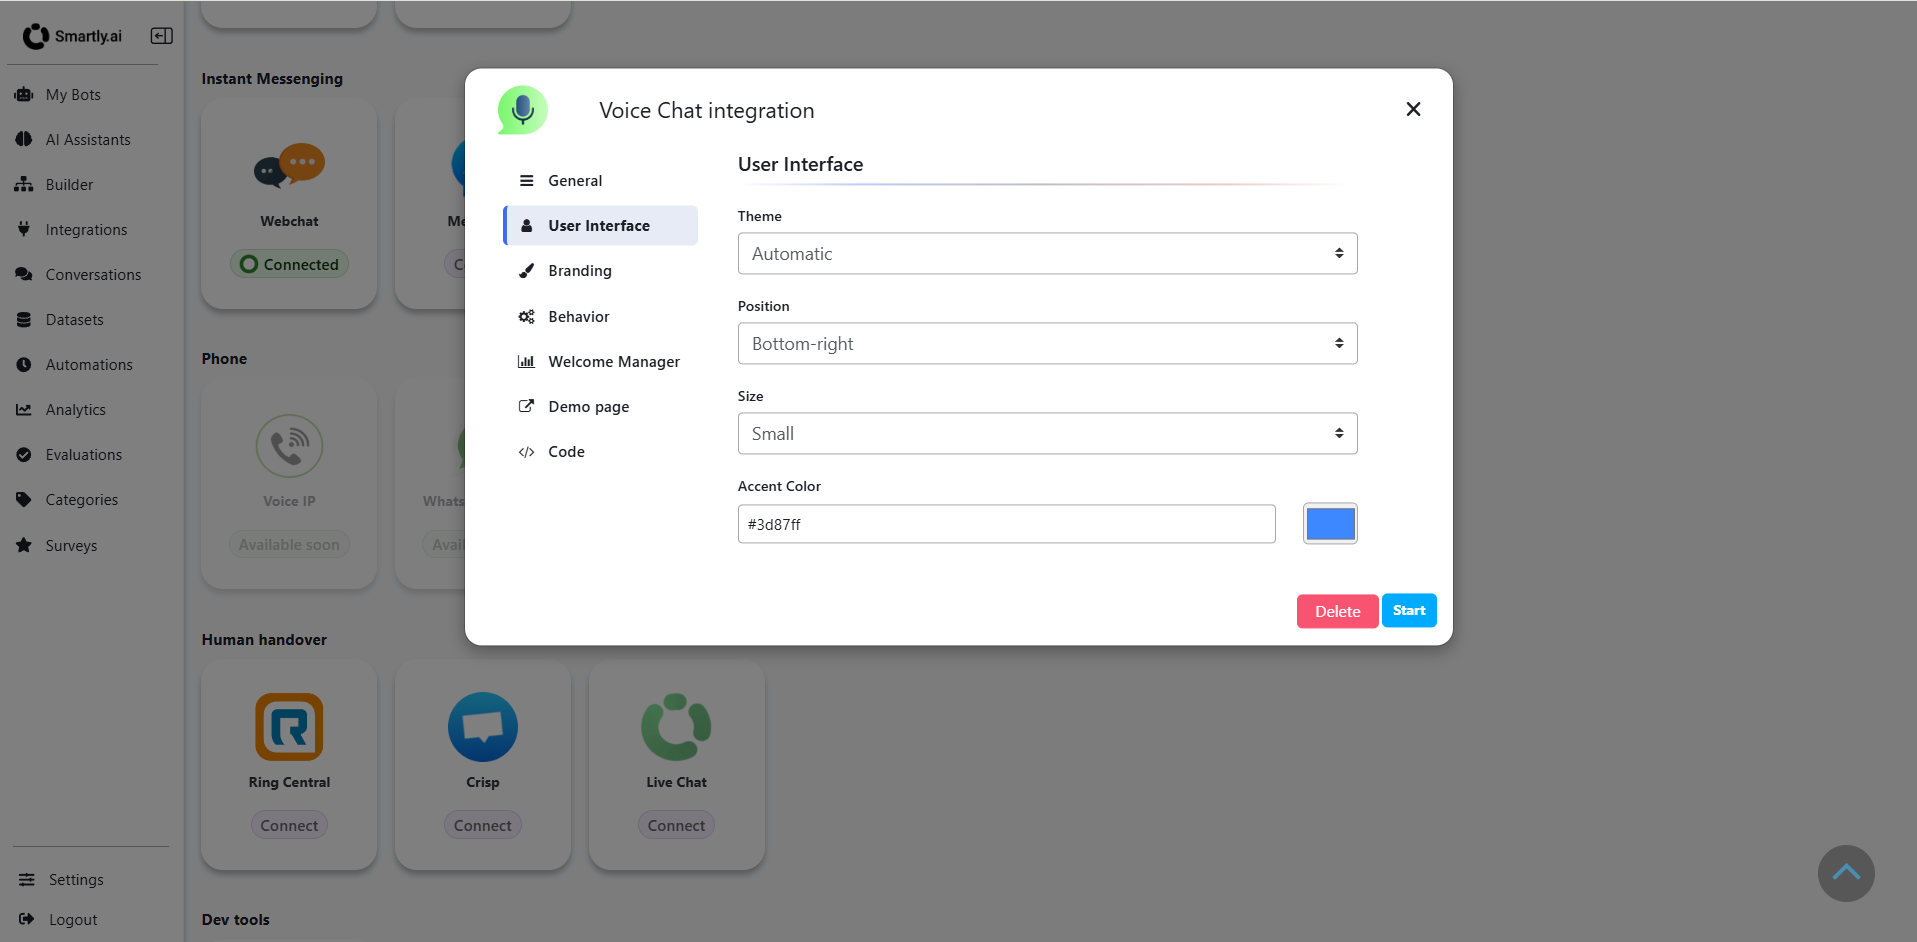
Configure the following visual settings:
Theme
- Choose between Automatic, Light, or Dark mode
- Automatic adapts to user's system preferences
- Default: "Automatic"
Position
- Control where the voice chat widget appears on your page
- Options: Bottom-right, Bottom-left, Top-right, Top-left
- Default: "Bottom-right"
Size
- Set the widget size: Small, Medium, or Large
- Adjusts the voice chat button and interface dimensions
- Default: "Small"
Accent Color
- Customize the primary color of the voice chat interface
- Enter a hex color code (e.g., #3d87ff)
- Use the color picker for visual selection
- This color appears on buttons, active states, and highlights
Step 6: Configure Branding
Switch to the Branding tab to customize the text and company information displayed to users.
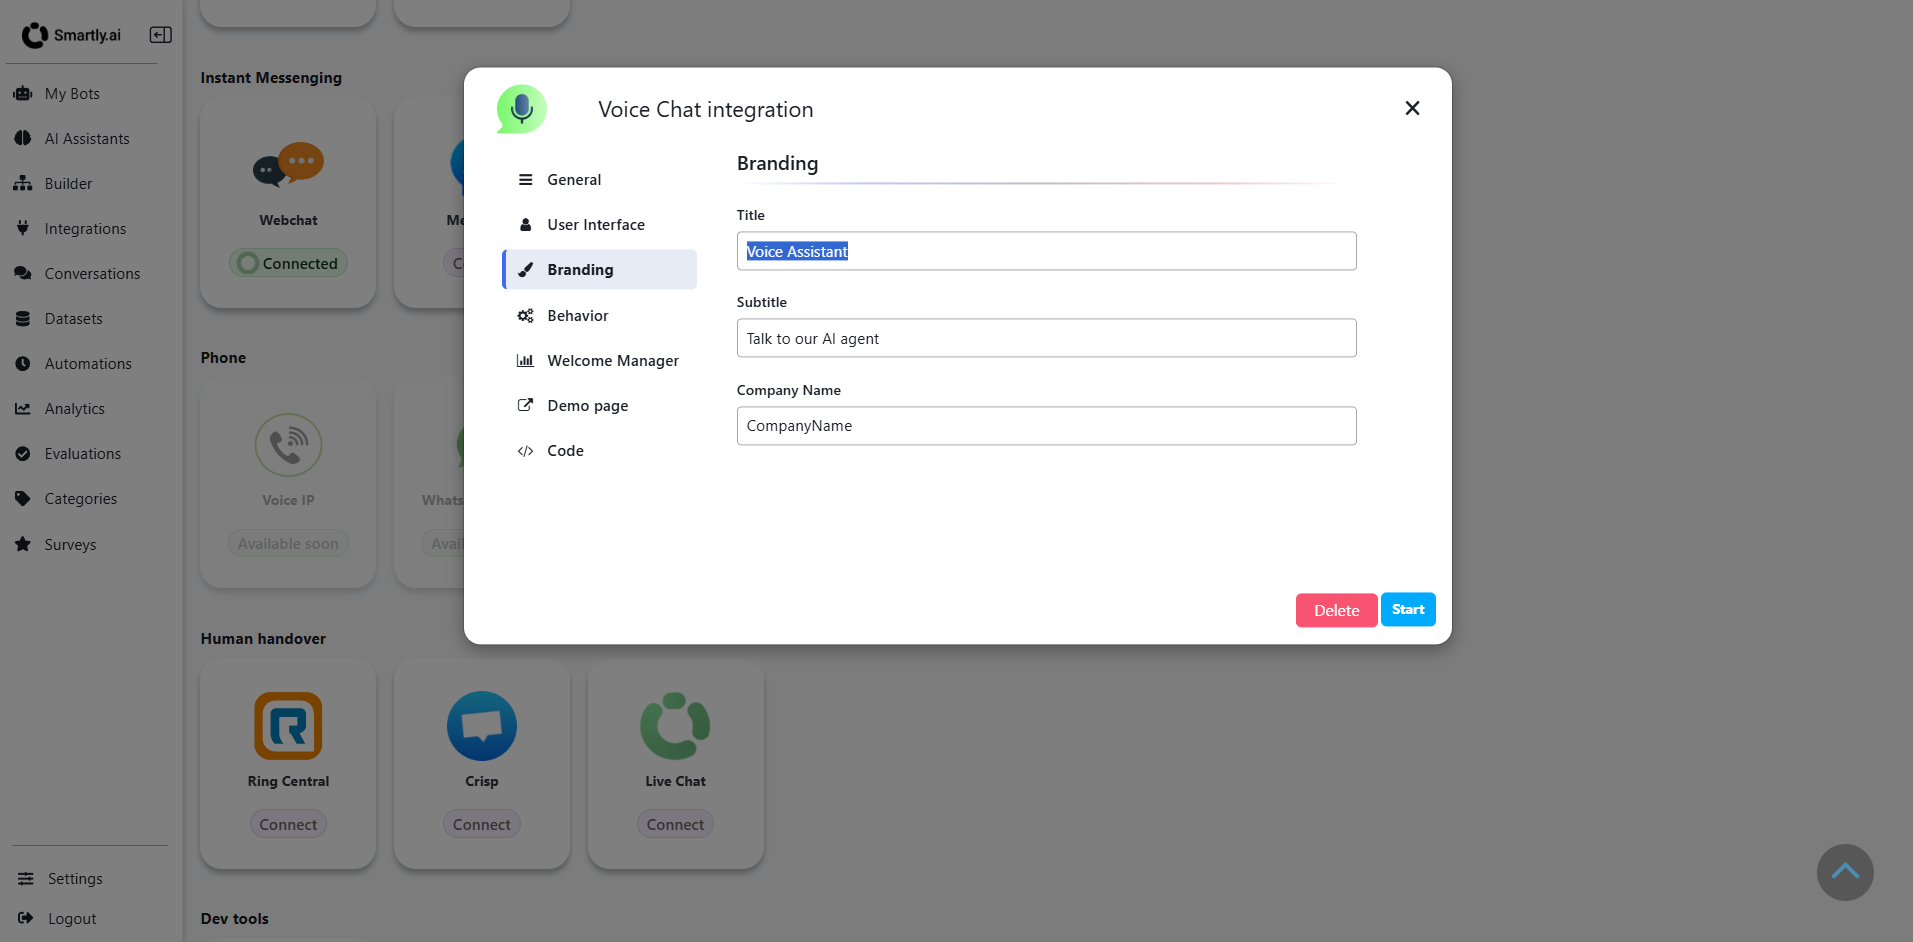
Set your brand identity:
Title
- The main heading shown to users in the voice interface
- Example: "Voice Assistant"
- This appears when users interact with the voice chat
Subtitle
- A supporting message or call-to-action
- Example: "Talk to our AI agent"
- Provides context about the voice interaction
Company Name
- Your organization or brand name
- Example: "CompanyName"
- Displayed in the voice chat interface footer
Step 7: Set Behavior Options
Open the Behavior tab to control how the voice chat functions.
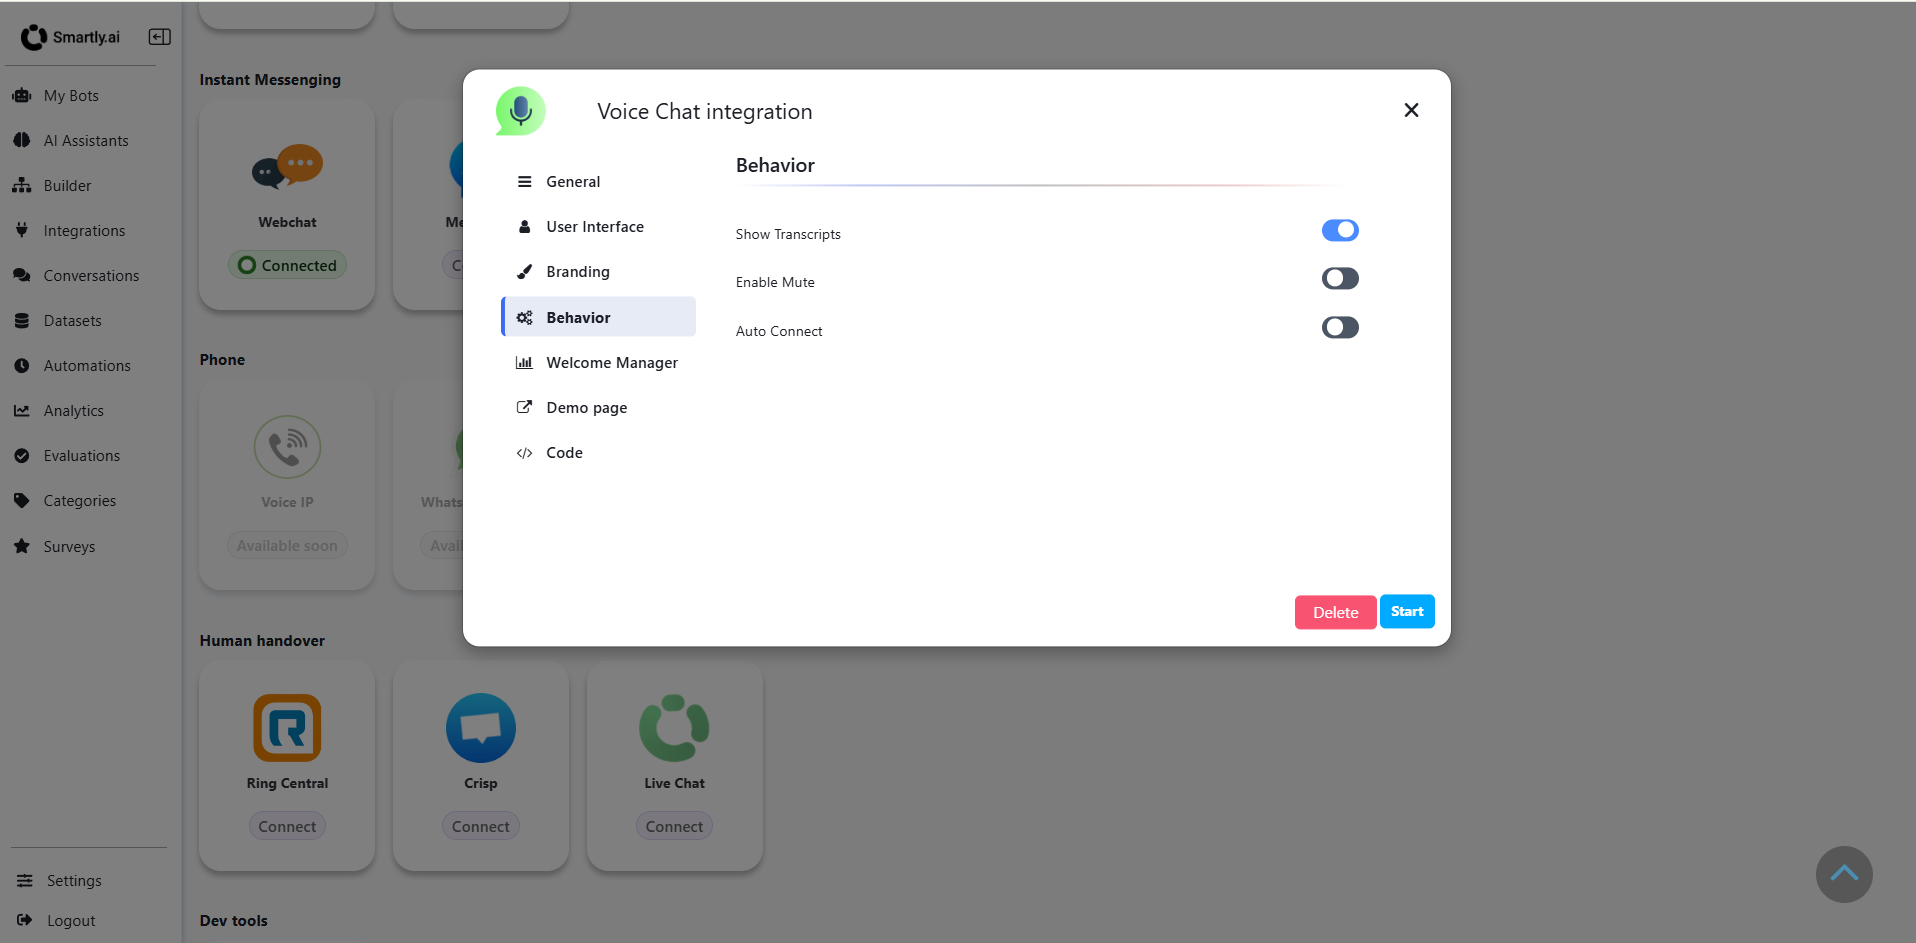
Configure these behavior toggles:
Show Transcripts
- Enable to display real-time conversation transcription
- Users can see their spoken words and AI responses as text
- Helpful for accessibility and conversation review
- Default: Enabled
Enable Mute
- Allow users to mute/unmute their microphone during conversations
- Provides user control over audio input
- Default: Disabled
Auto Connect
- Automatically start the voice chat when the widget loads
- When disabled, users must manually click to start
- Default: Disabled
Step 8: Configure Welcome Manager
Navigate to the Welcome Manager tab to set up multilingual greeting messages.
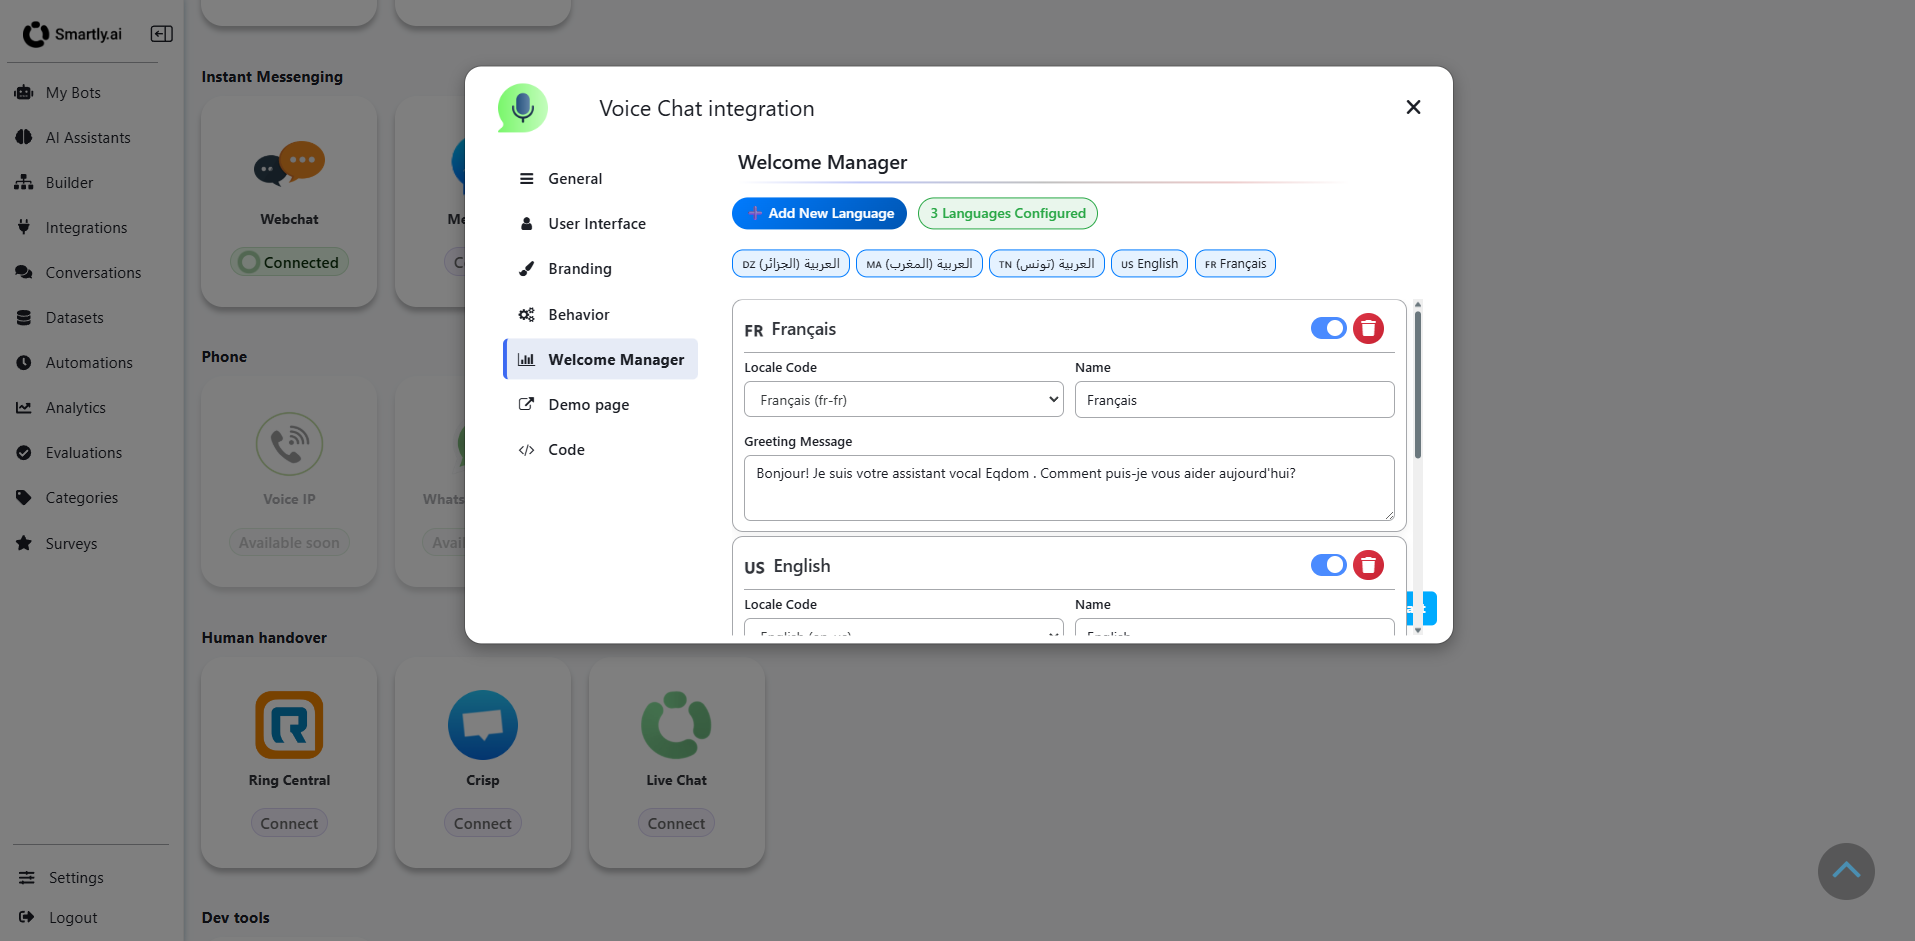
Manage language-specific greetings:
Add New Language
- Click "Add New Language" button to configure additional languages
- Support multiple languages for international users
For Each Language:
Locale Code
- Select the language/locale from dropdown (e.g., "Français (fr-fr)", "English (en-us)")
Name
- Display name for the language option
- Shown to users in the language selector
Greeting Message
- The initial message spoken when a user starts a voice chat in this language
- Example (French): "Bonjour! Je suis votre assistant vocal. Comment puis-je vous aider aujourd'hui?"
- Example (English): "Hello! I'm your AI voice assistant. How can I help you today?"
Language Status Toggle
- Enable/disable specific languages
- Only enabled languages appear in the user-facing language selector
Delete Language
- Remove a language configuration using the delete button
The status badge shows total configured languages (e.g., "3 Languages Configured")
Step 9: Generate Demo Page Link
Once you've configured all settings, go to the Demo page tab and click "Start" to activate your Voice Chat integration.
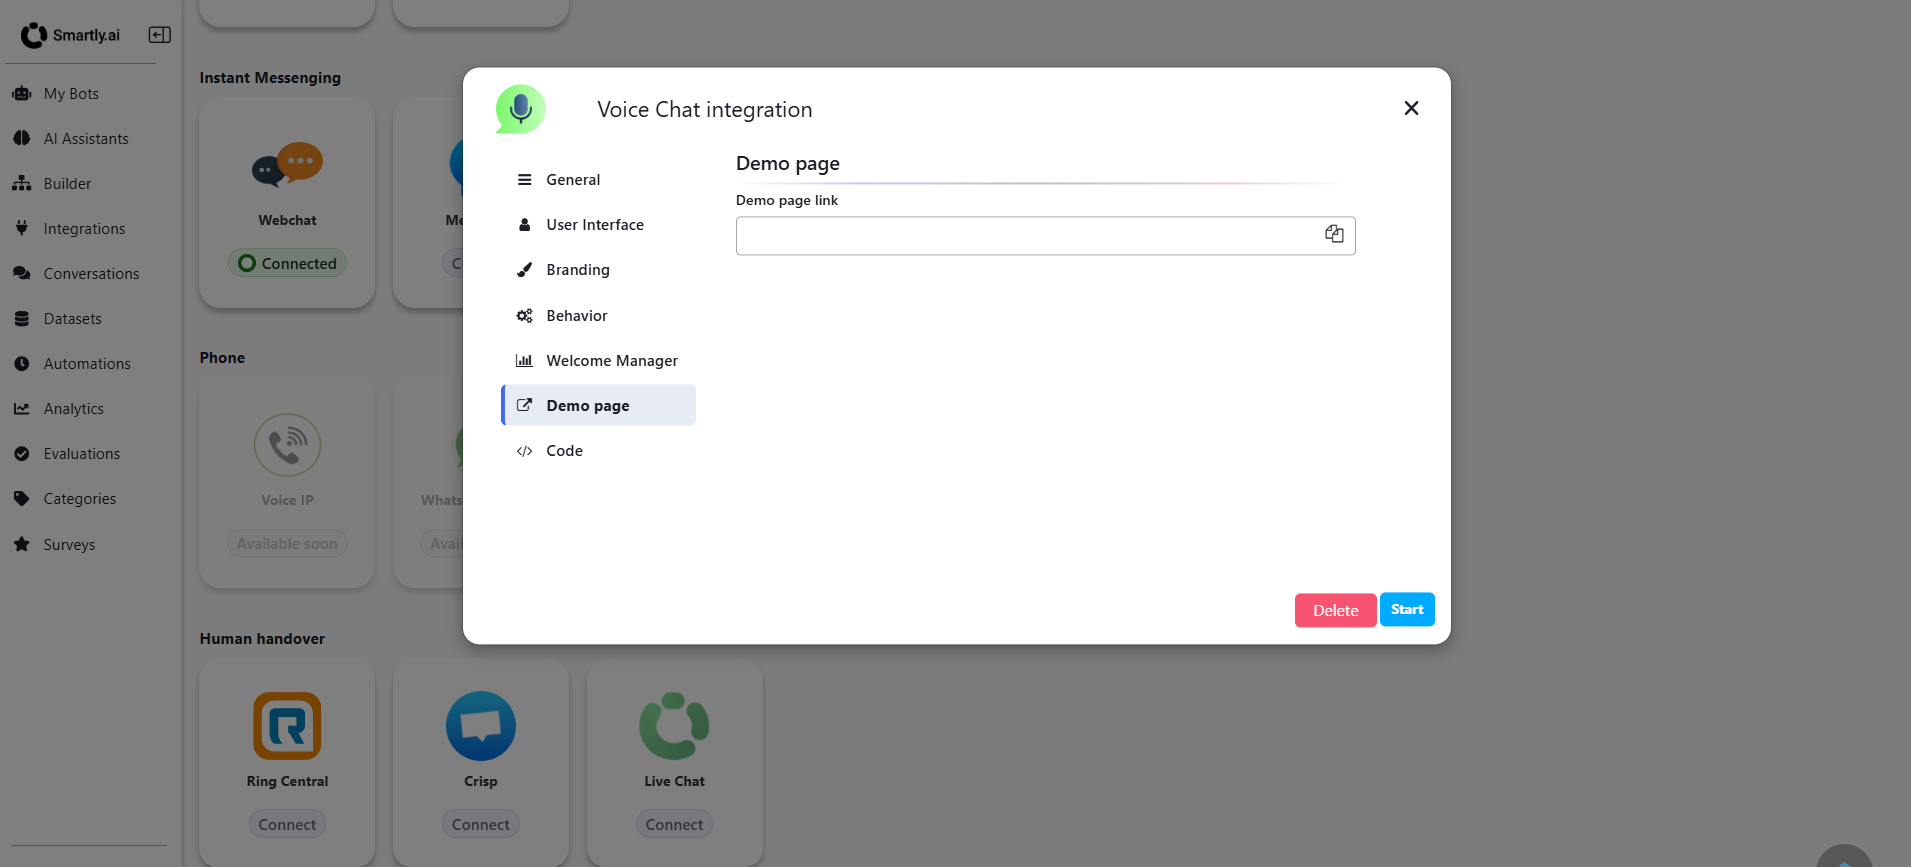
After clicking "Start", a unique demo page link will be generated:
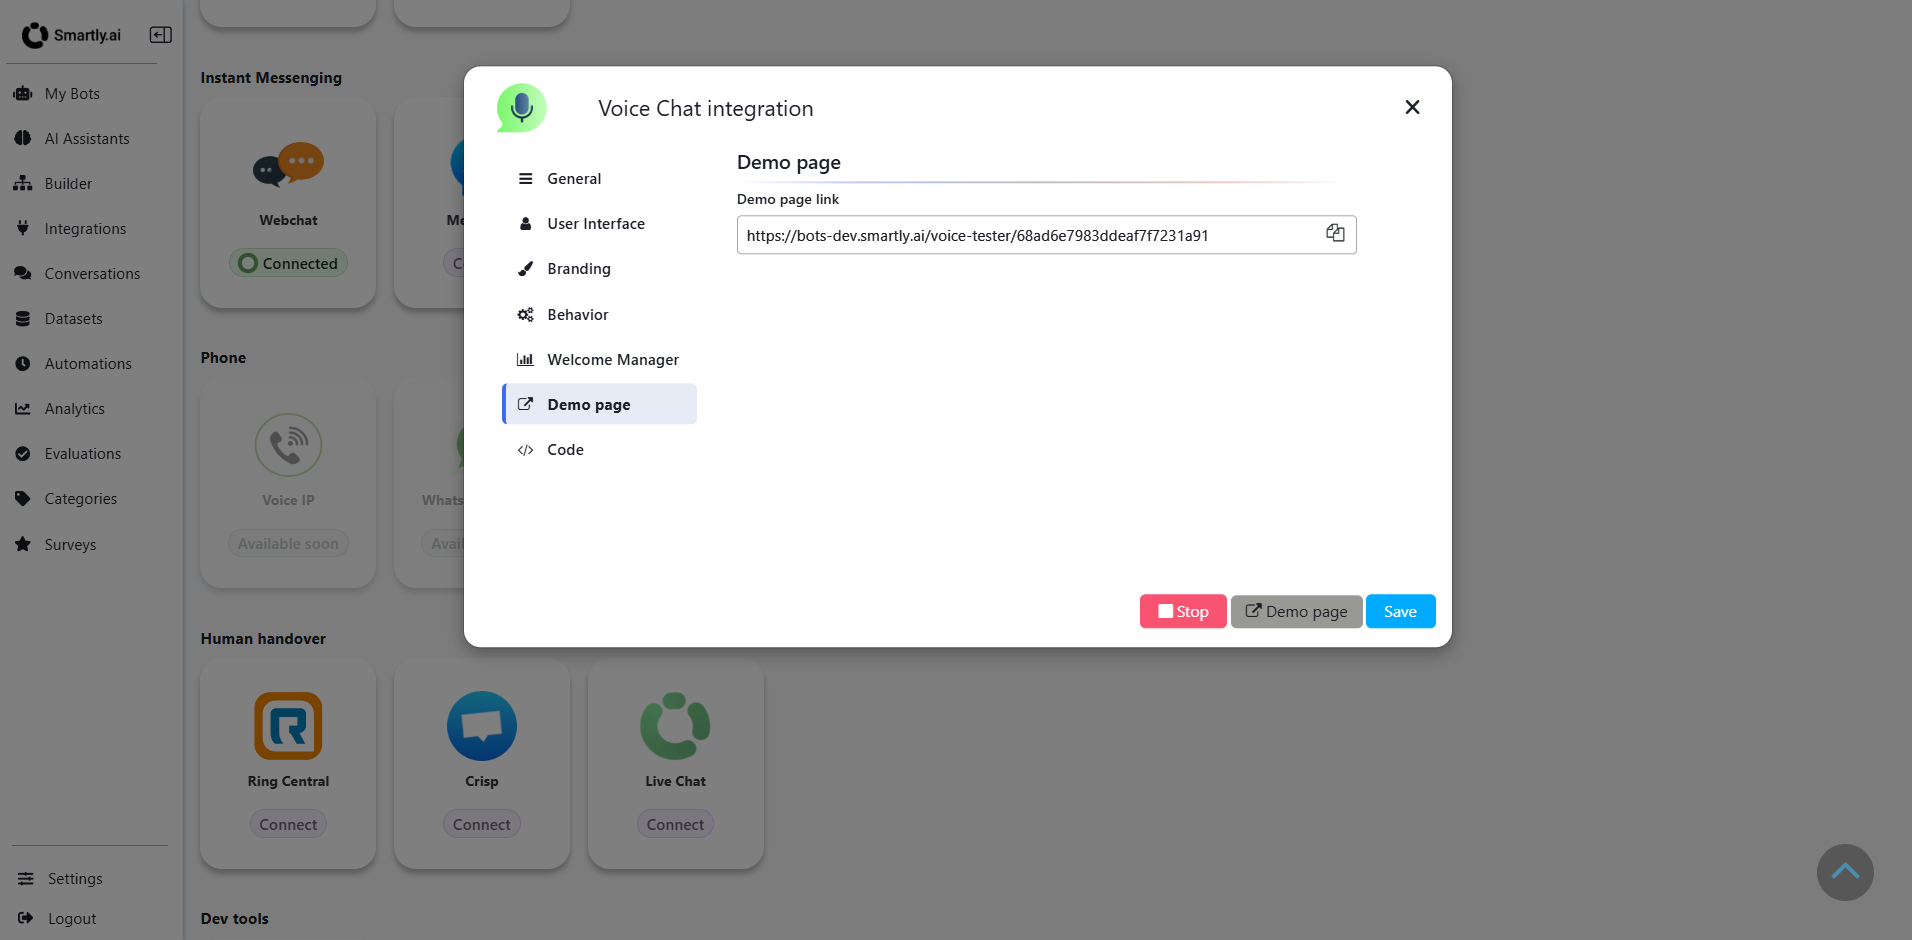
Demo page link
- A unique URL for testing your voice chat integration
- Format:
https://bots-dev.smartly.ai/voice-tester/{unique-id} - Click the copy icon to copy the link
- Use this link to test the voice chat experience before embedding it on your site
Step 10: Get Integration Code
Switch to the Code tab to retrieve the integration code for your website.
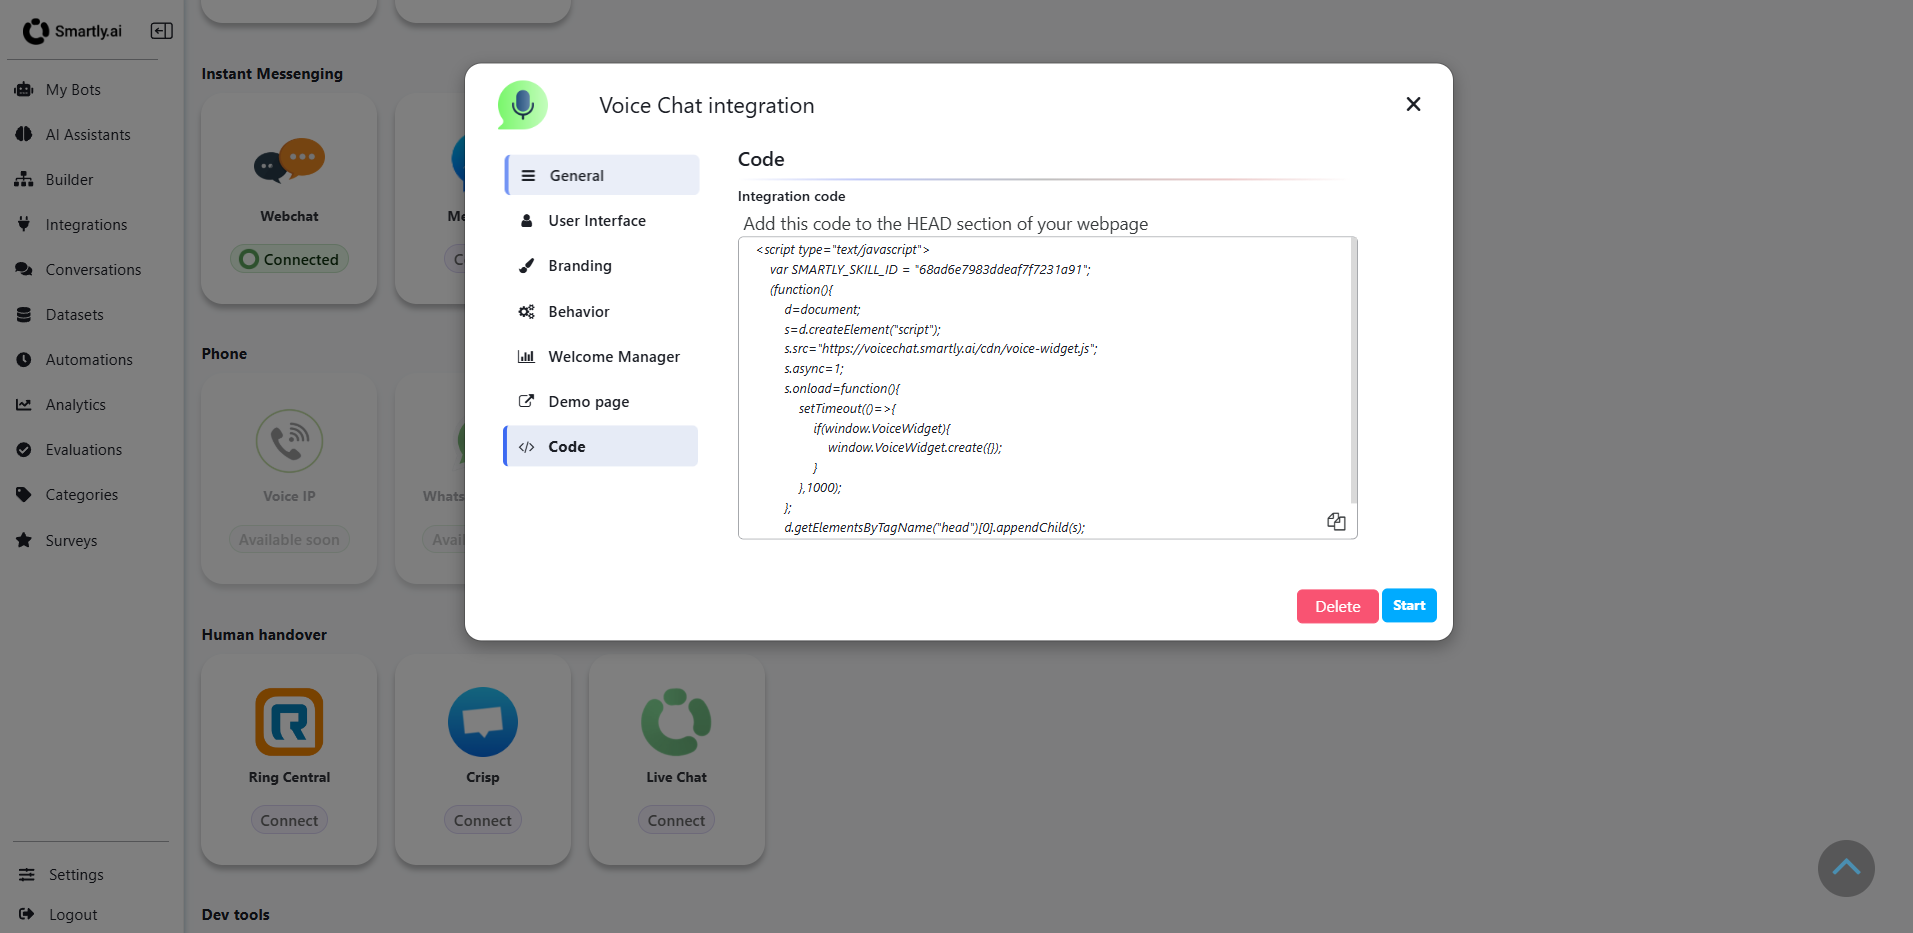
Integration code
- Copy the provided JavaScript code snippet
- Add this code to the HEAD section of your webpage
- The code includes:
- Your unique
SMARTLY_SKILL_ID - Voice widget initialization script
- Automatic widget creation on page load
- Your unique
Example integration code:
<script type="text/javascript">
  var SMARTLY_SKILL_ID = "68ad6e7983ddeaf7f7231a91";
  (function(){
    d=document;
    s=d.createElement('script');
    s.src='https://voicechat.smartly.ai/cdn/voice-widget.js';
    s.async=1;
    s.onload=function(){
      setTimeout(()=>{
        if(window.VoiceWidget){
          window.VoiceWidget.create();
        }
      },1000);
    }
    d.getElementsByTagName('head')[0].appendChild(s);
  })();
</script>
Using the Voice Chat Widget
Once integrated on your website, users can interact with the voice chat widget. Here's the complete user journey:
Starting a Voice Conversation
Step 1: Click the Voice Chat Button
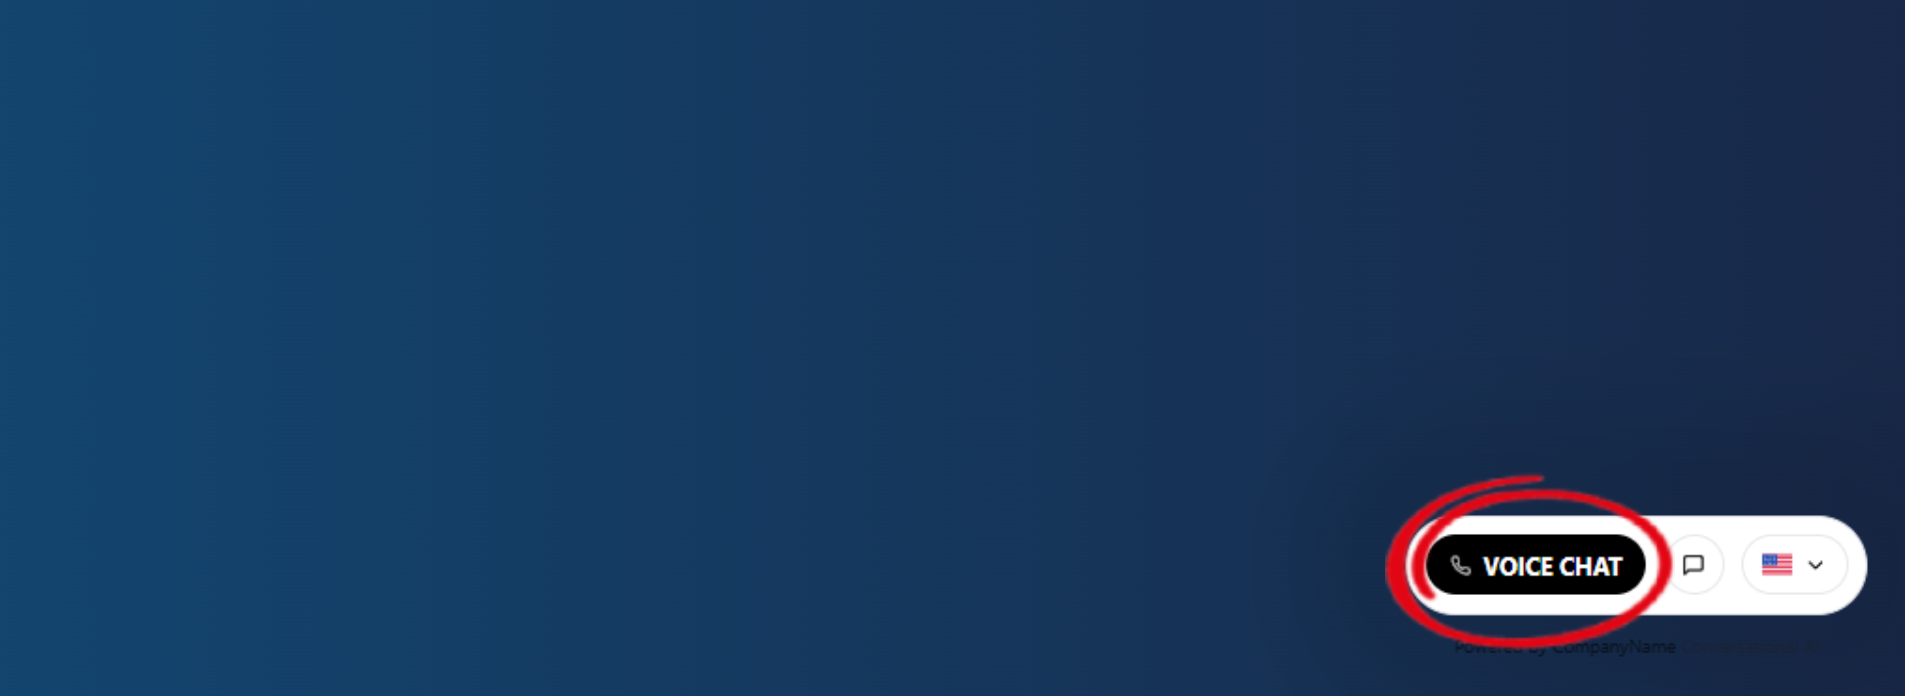
Users click on the Voice Chat button in the widget to initiate a conversation.
Step 2: Grant Microphone Permission
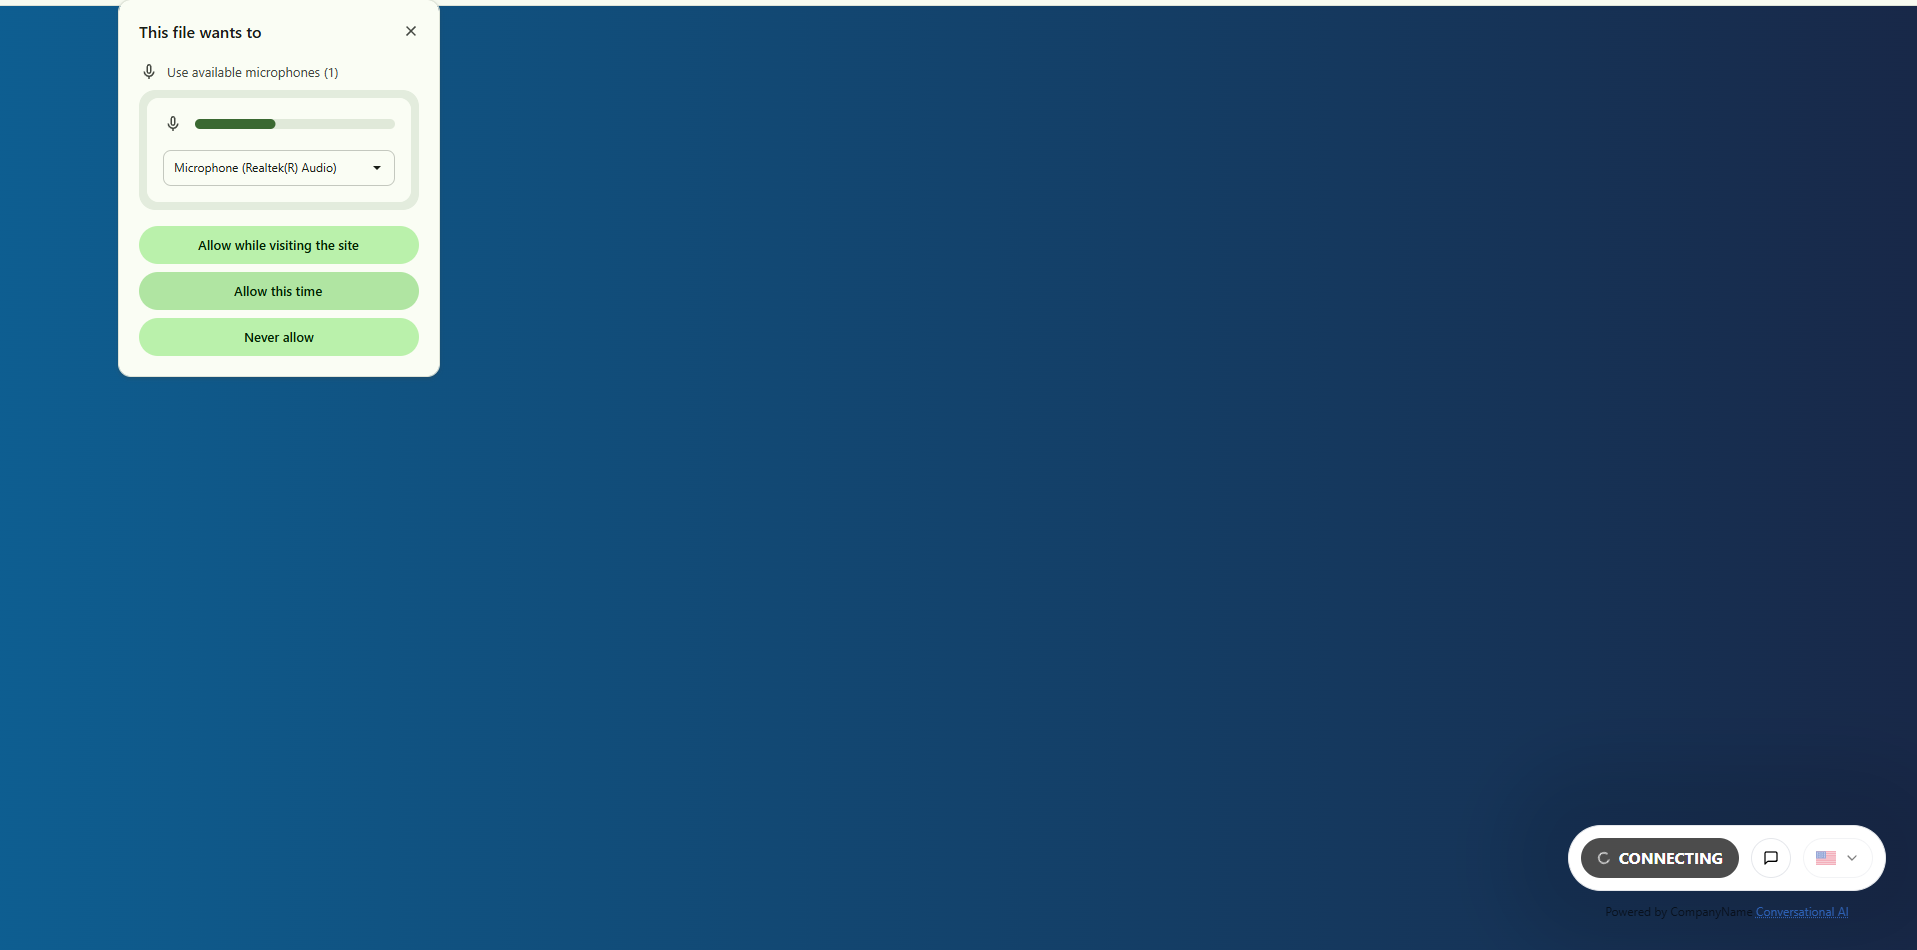
The browser will prompt users to grant microphone access. Users should:
- Select their preferred microphone from the dropdown
- Click "Allow while visiting the site" or "Allow this time"
- The widget will show "CONNECTING" status during setup
Step 3: Receive Welcome Message

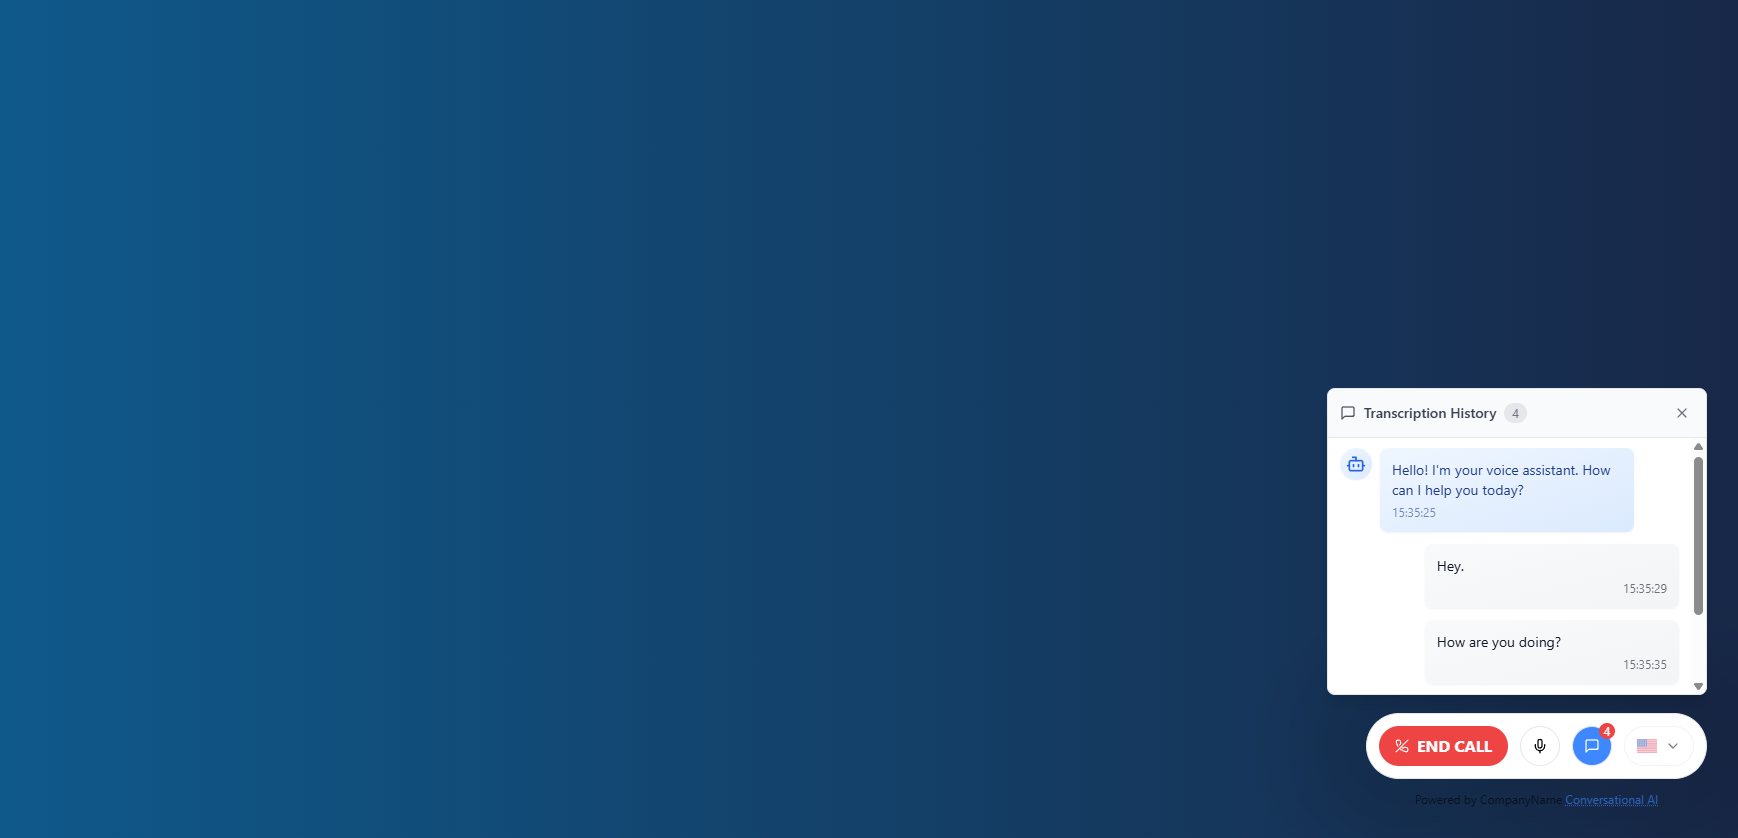
After the connection is established, the AI assistant will greet the user with the welcome message you configured. The message appears in the Transcription History panel along with a timestamp.
Step 4: Start Speaking
Users can now speak naturally with the AI assistant:
- The conversation appears in the Transcription History panel
- Both user messages and AI responses are transcribed in real-time
- Timestamps show when each message was sent
Step 5: End the Conversation
When finished, users click the "END CALL" button to terminate the voice conversation.
Additional Features
Language Selection
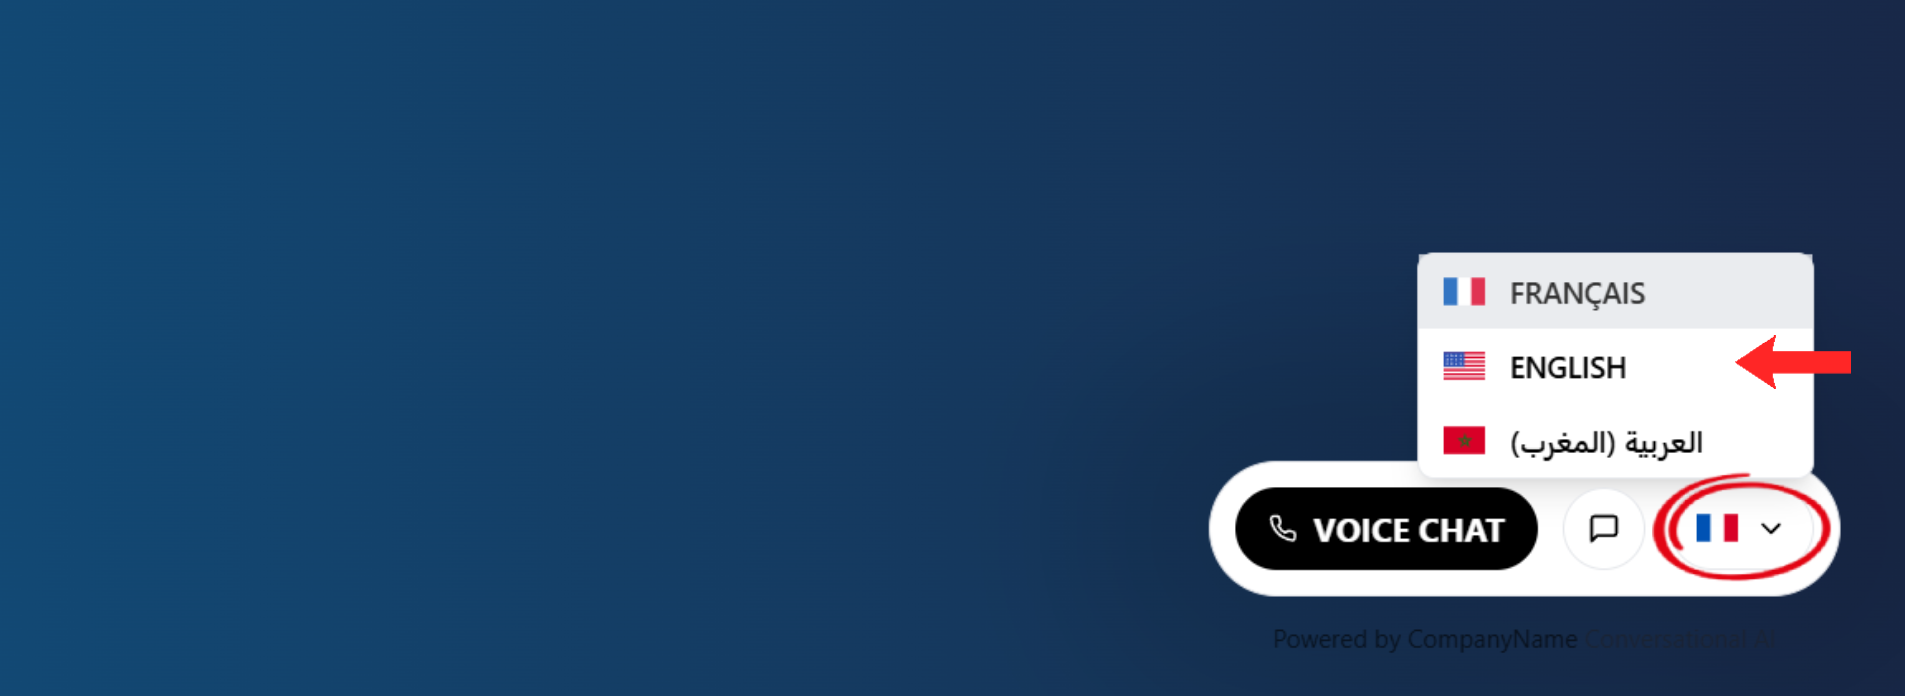
Users can select their preferred language from the dropdown menu in the voice chat widget. The available languages are those you configured in the Welcome Manager tab.
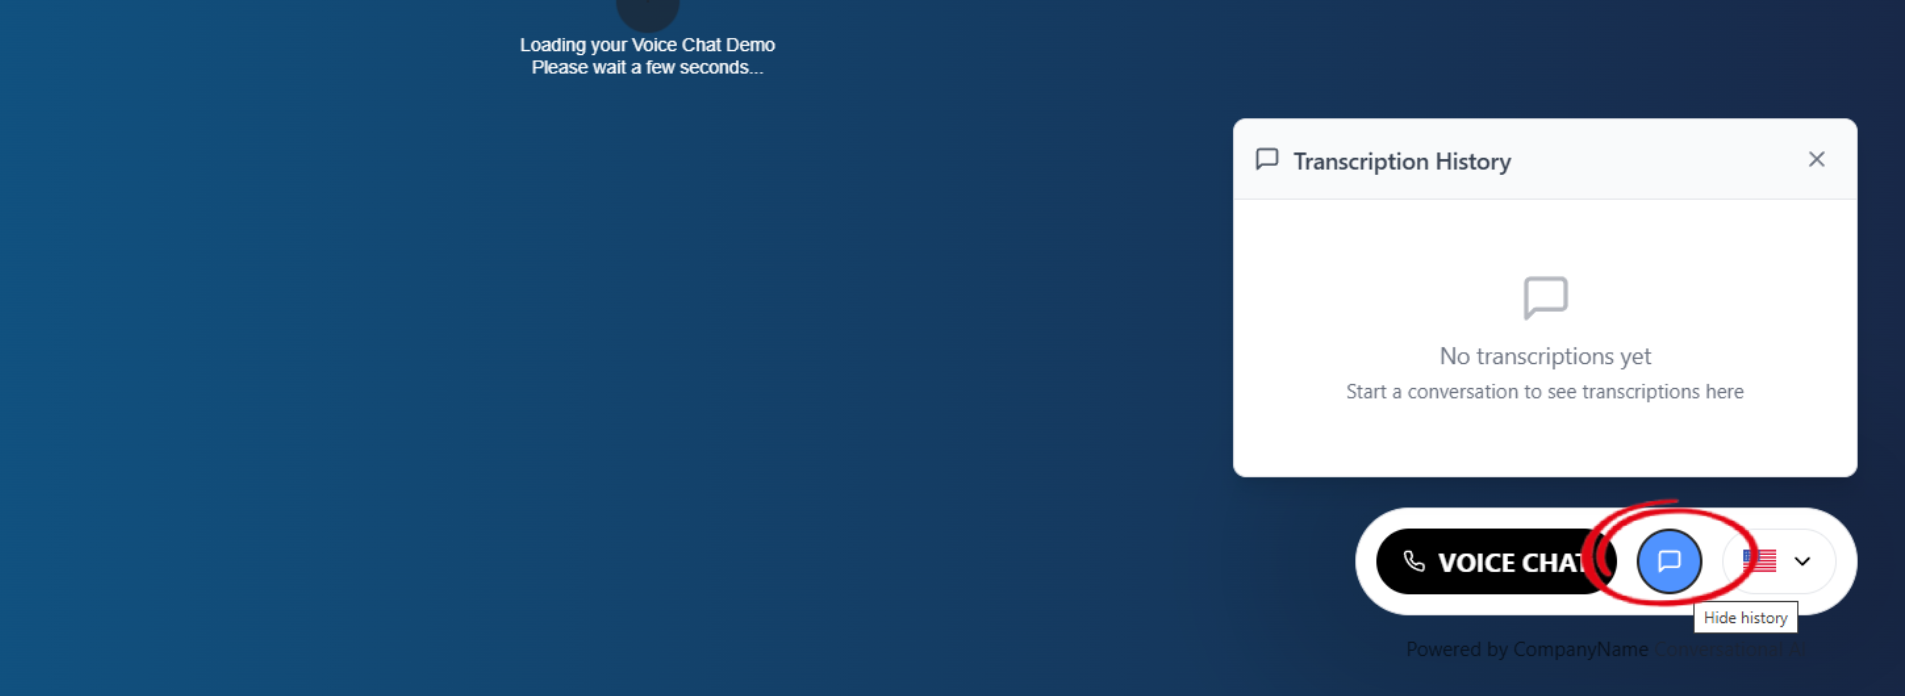
Transcription History
When "Show Transcripts" is enabled in Behavior settings:
- Users can click the transcription icon to view conversation history
- A "Transcription History" panel displays all spoken interactions
- Shows both user input and AI responses as text
- Users can hide the panel using the "Hide history" option
Updated 7 months ago